The PUK 5.1 is super fast
and has micro settings for the thinnest materials. Take a look
at the specs.
Though the specifications on the
5.1 state that .2mm (.008") metal thickness can be welded, I
have proven that metal as thin as .013mm (.0005") can be
successfully welded.
Above: As with every PUK I've owned, PUK 5.1 also sits to the
right of my main bench. I set up ventilating behind the welding area
to capture all metal fumes. Venting or using the optional smoke
absorber is a necessity, as with all other forms of welding and
soldering which produce metal fumes.
Overview
As any silversmith knows, silver solder is the ideal material to use
when joining sterling pieces by the traditional method of brazing.
Sometimes I will receive an object which has been lead-soldered in
the area in need of repair (or re-repair). Sometimes the joined area
is not visually accessible, and I don't know if lead has been used.
In either case, I cannot use silver solder because the high
temperature required will melt any lead in the joint and allow it to
form its own alloy with the silver. Not pretty! And, using a low
temperature tin/silver solder won't give me a sound joint or good
silver color. For this reason, I had been exploring newer
technologies for joining metals. I tested laser welders from a few
manufacturers, but found that their compartments are too small for
working on holloware. In addition, they are expensive to buy and
notoriously expensive to repair, and the down-time for repairs can be
substantial. I also tested the Mini Pulse III (an arc welder) from
Aelectronic Bonding, which had too few welding power options and
didn't allow me to get into tight spaces.
I tested a friend's Lampert PUK2 pulse arc welder for a few months,
and refined my technique to the point where I felt confident to
purchase Lampert's PUK3s Professional, which was developed to weld
silver more successfully. I was so impressed that I soon purchased
the PUK3s Professional Plus which had a broader power range,
additional impulse settings, and five programmable settings.
The electrodes
The 10 electrodes come pre-sharpened on both ends. I wait until I
have used all 10 electrodes (20 tips) before sharpening them at the
same time with the supplied mandrelled diamond disk. This saves time.
I mount the disk in my Foredom handpiece and secure it to the bench
over the dust collecting vent. The recommended tip angle is 15%.
Electrode replacement in the PUK handpiece can be accomplished within
five seconds.
Advice on welding larger objects
Whether it be pulse arc or laser, welding isn't meant to substitute
for brazing large objects. Welding long seams (e.g., on coffeepots or
candlesticks) is more time-consuming than simply using the welder to
tack a seam in preparation for brazing.
If attaching parts to large bearing surfaces (e.g., a large finial to
a coffeepot cover), it's best to tack the part in place, then use the
capillary action of torch-brazing to fill the void. Always consider
the time it will take to weld or braze and the subsequent clean-up.
The handpiece can be removed in three seconds for welding freehand.
Lampert pulse arc welder highlights
• Uses the same alloy as the piece being created or repaired (no
color issues as with solder);
• Tacking eliminates the shifting of joints and the time
involved in wiring-up an object;
• Repair objects without harm to stones or patinas;
• Attach findings without losing metal hardness;
• Work on material as this as .0005";
• No firescale or firestain due of argon protective atmosphere;
• Localized heat won't melt nearby joints or damage stones;
• Fill-in porosity with the same alloy;
• Simple and intuitive to operate;
• Certified product safety: GS & CE marks;
• DIN CERTCO certified eye protection in the microscope lens;
• Maintenance-free;
• Small footprint - fits into every workshop;
• Very low cost of consumable materials (electrodes);
• Extremely low argon consumption compared to other systems (I
use only 1.5 lpm);
• Touch-screen operation;
• Easy-on, easy-off handpiece nozzle when changing electrodes;
• Built in Germany with attention to the minutest detail - you
can see and feel the quality;
• 3-year warranty!
space
The basic cost for the PUK 5.1 is $4,795. It includes:
WARNING! Shaded safety glasses and goggles made for
oxy-acetylene brazing and welding are NOT intended for arc welding.
The flash that's produced when arc welding is much more intense and
requires the auto-darkening function found on PUK pulse arc welding
microscopes and magnifiers.
Optional accessories I added:
Articulating Arm
This updated articulating arm ($575) allows me to work on larger
objects underneath the microscope. It swivels 360 degrees and secures
with the twist of only one knob.
Headrest
Allows for relaxed and fatigue-free working with the welding
microscope. It also helps maintain concentration on the workpiece and
eliminates fogging and the deposit of eyelash oils on the microscope lens.
Argon gas, which protects the weld from developing oxides, is the
other expense for running the PUK. Without gas, the PUK won't run
(and you would never produce a successful weld without it, regardless
of your chosen welding apparatus). To reduce the cost of argon, I
would advise leasing a 300-cubic-foot cylinder (5' tall x 10"
diameter). I'm paying $75.20 (Industrial
Welders Supply in Rhode Island) per refill (includes hazmat &
state tax) plus $50 for the yearly lease. Argon purity of at least 99.997%
is recommended by Lampert.
The regulator comes standard with the PUK 5 & 5.1.
These are the additional specifications on my argon:
I have been running the PUK on 1.5 liters of argon per minute
regardless of the alloy I'm working with.
Definitely purchase a
Speedwire Welding Wire Dispenser (not a Lampert product).
Welding wire spooled in containers like the ones above make it
difficult and time consuming to steady thin wire exactly where you
want it (it tends to flop around). The Speedwire Welding Wire
Dispenser makes thin wire much easier to weld since it puts it
exactly where you want it – without movement. Speedwire allows
wire as this as .005" (.127mm) to be dispensed, though, you'll
probably be using the more widely available .010" (.25mm)
wire. I bought the refillable Speedwire ($23) and coil the
sterling wire myself on steel rod in my lathe, then relax the coil by
removing the wrapped rod from the lathe and gently annealing it while
still attached. Speedwire can also be supplied with pre-installed
wire of numerous precious metal alloys. See the Speedwire in use here,
and see how
the receptical can be filled. For more information and purchasing
from the inventor, go here.
Speedwire can also be purchased from: Hoover & Strong, Rio
Grande, Stuller, among others.
Conclusion
Using this relatively new technology has broadened my scope of
options when joining metals. I can mend a pinhole with a dollop of
sterling, dress it down, and give it a quick polish without
disturbing the patina. The end result: absolutely no indication the
piece was repaired - the color is perfect! I can repair a bezel
surrounding a piece of glass without removing it. Normally I would be
forced to unmount the glass, possibly damaging it in the process. I
even used the PUK to weld a steel wire to the end of a hardened steel
pin that was buried in a candelabra stem. I heated the stem, melting
the lead solder, and pulled the pin out. How slick is that?
When I say I use the PUK every day I'm working, I'm not exaggerating.
It was the most prudent (and expensive) purchase I've ever made for
my shop, but it's already paid for itself. Once you own this little
gem, it will open a whole new world of possibilities. Oh, another
plus: Lampert Tools USA offers up to five hours of
free training when you purchase a PUK welder. Simply contact owner
and goldsmith Robert Sepiashvili in Chicago
to make an appointment.
Have you ever been so frustrated that you throw-up your hands when
welding heavy-gauge silver? Well, let me try to help. As with brazing
silver, you know you need to bring up the temperature of the metal in
order to solder successfully. The same is true for welding, though,
to a lesser extent. Solder is attracted to heat and so is welding
wire. There are times when I'm welding a heavy casting or fabricated
piece and I will first heat it. Perhaps it's under a heat lamp,
hairdryer, or hot air gun. The point is, welding to a cold surface
which isn't immediately warmed by the welding process itself will be
considerably harder. I'm sure you've noticed how much easier welding
wire melts to the base material of a smaller piece. It's because it
warms more quickly. Even using the smoothing method may not help get
the job done. You may even need insulated gloves when working on
larger pieces, especially when using higher power and milliseconds.
So, make sure to prepare those larger pieces of metal prior to making
your initial weld and let me know how it worked for you.
10/26/2021:Repairing white metal with tin/silver solder
There have been times when I needed to reattach parts to white metal
objects or add material to weak joints. In these cases I have been
using tin/silver solder and pulsed the material into and onto these
areas. It gives a substantially stronger join than traditional
tin/lead alloys and also offers a much better silver color. Here I
added the tin/silver between the body of the piece and the handle,
which originally had a solder seam that was much too thin. The seam
is in an unfinished state...
On the foot of the same piece, I
reinforced the back so it would better support the weight of the
object's body. Many white metal objects were never made for practical
use since the alloy is so soft. When blended, I will apply a black
patina to blend with the rest of the foot...
9/29/2021: The job I thought would never end!
Well, this was a not-so-fun project. What you’re looking
at is a sterling casserole dish with a dented handle that I tried
removing by drilling a hole, tapping it, then pulling. The dent was
pretty severe prior to removal, and, unfortunately, I hadn’t
taken a picture before the repair. Anyway, the next method of attack
was to drill two holes on the opposite side of the dent and try
pushing it out with a steel rod. As you can see that worked up to a
point but left the surface bumpy. I was going to use sterling wire to fill-in
the lower areas and the hole that were left, but decided to use a
much more straightforward technique. I cut out the damaged section
with a separating disc and made a partial ring to replace it. (Lesson
learned for the next project of this type.). I put a bevel on the top
corner of the sheet and welded it in place with sterling/platinum
wire. I then compacted the welds, leveled the surface with 2000-grit
paper and polished.
7/10/2021: Foot Surgery
This little Chinese Export cutie
came to me for three new forged toe implants welded in place with
Herman's Sterling/5% welding wire.
7/6/2021: Welding White Metal
I'm sure many visiting this blog
don't get anywhere near white metal. Should you run into a piece that
needs repair, tin/3% silver solder does a fantastic job! On this
12" tall silverplated piece, I used the alloy and the silver
setting to mend a deep crack in one of the under-branches. The
tin/silver melded beautifully and gave a nice bright silver finish,
perfect for a plated piece!
4/22/2021: When Repairing
Plated Objects, Welding is the Answer
This Devlin Easter egg arrived
with one of its fish detached. The image below is the fish back in
place utilizing pulse arc technology. It allowed me to reattach the
fish using sterling and localized heat which maintained the patina on
the anchor. Brazing would have burned off the patina and blistered
the gilding. The piece was then cleaned, tarnish removed, and
protected with wax.
Below you can see where the fish
was welded back in place.
2/28/2021: Trach Repair
This trach required the inner
cannula swivel clasp to be secured. I enlarged the head on top of the
tubing with sterling so the clasp wouldn't slip off. The flapper
plate's flap was leveled as it wasn't closing completely, allowing
air to escape. I added sterling to the tip of the outer cannula which
had worn thin.
Above: This trach required
the inner cannula swivel clasp to be secured. I enlarged the head on
top of the tubing with sterling so the clasp wouldn't slip off. The
flapper plate's flap was leveled as it wasn't closing completely,
allowing air to escape. I added sterling to the tip of the outer
cannula which had worn thin.
2/1/2021: Arm Rests
My arm rests are topped with rubber from floor tiles – they're
extremely comfortable.
1/9/2021: Electrode Longevity
When you're welding and your electrode loses its sharpness, extend
its pulsing life by turning the knob clockwise one click at a time,
increasing the power. Give it a try!
12/21/2020: Welding Nickel
Today was the first time attempting to weld nickel. Not fun. No, not
fun in the least. I eventually found a decent setting:
Bronze
Power: 40%
Milliseconds: 2
Mode: Corner
The filler I used was my Sterling 5% Platinum wire. Give it a try!
12/21/2020: A Better Sleeve
Now here's a snazzy idea! Ya know that threaded sleeve that knuckles
down the internal chuck on your handpiece? Your fingers sometimes
slip on it, right? Wrap it with some shrink tubing which will give
you a better grip!
11/13/2020: Repairing Hinge Knuckle
Have you ever had a drill bit drift off course? Well, that's what
happened with this flask cap. I tried drilling-out the hinge pin and
it thinned the inside diameters of a couple of hinge knuckles.
Instead of trying to round-out the hole by filling it from the
inside, I pushed in the thinned area and added metal from the
outside, which you see here. The hinge wire provided a form to
burnish the thinned area around as well as backing-up the knuckle so
the area wouldn't collapse from the pulse.
8/9/2020: New from Lampert! Xtra Fine Diamond Wheel #100-707
I tested the wheel against Lampert's standard wheel and the result is
impressive, resulting in a sharper point and uniformity of cut =
better welding outcomes. Top electrode sharped with Xtra Fine disc...
7/30/2020: The Value of the PUK Articulating Arm
This sterling rooster decanter required some filling-in of the
damaged wire rim. Because of the object’s size, Lampert’s
articulating arm made the operation successful.
5/24/2020: Pin: Totally PUK created
Another stab totally constructing a piece using the PUK welder. This
2.5" pin took much longer than brazing, but I was able to weld
the top prong in place after the moonstone (from high school days)
was inserted. The piano wire was again welded inside the tubing, and
the overall piece is stronger than if I brazed it because some of the
elements were hardened prior to attaching.
What I would do if I were to duplicate this piece:
1. Braze most attachments;
2. Weld the pin in the tubing;
3. Weld the top prong in place after setting the stone.
The above steps would save time and leave cleaner seams.
5/18/2020: Pin: Totally PUK created
It's been years since I made a piece of jewelry. This 3"
sterling pin with rutilated quartz was entirely constructed using
sterling/5% platinum wire and the PUK pulse arc welder.
4/17/2020: Welded weighted silver
Tacking long joints rather than using binding wire guarantees
perfectly aligned seams. With sterling, my welding wire will work
much better than simply pulsing on the seams as the added platinum
gives a much stronger tack. Of course you will still want to heat the
piece evenly prior to concentrating the heat on the seam.
4/11/2020: Welded weighted silver
As you may have discovered, welding objects with pitch inside can be
a challenge. In this particular case I had to cut the cup from the
stem, remove the pitch, then char the residue. Welding with char in
vacinity will be more successful than having the possibility of pitch
oozing into the seam and contaminating it.
3/11/2020: Welding thin-gauge silver?
There are occasions when I’ll use .020” (0.51mm) sterling
wire to weld very thin material, like the ferrule pictured below
which is made of .005” (0.18mm) sheet. Practice on some
thin-gauge material by drilling holes and using some heavy wire, like
what I used. Use the sterling prong setting with 30% power and 3
milliseconds. Put the wire in the hole or over it and place the
electrode on the wire at a 45% angle, pointing towards the edge of
the hole. On the second pulse, put pressure on the wire so the heat
from the pulse will “grab” it and continue filling the
hole. It will take some practice, but when you become proficient
you’ll fill those holes more quickly than using the normal
.010” (0.25mm) wire. Good luck!
2/2/2020: Are your lenses clean?
Are you keeping your welding sight line clean? Your microscope lenses
and underplate gradually get dirty and perhaps you think your vision
is failing. Keep a Selvyt cloth and cotton swabs nearby and clean
those lenses – often. Your eyes will thank you ;~)
1/3/2020: Welding white metal and lead
A few days ago I was soldering a white metal foot back on the leg of
a silverplated gravy boat. The temperature of the foot got hotter
than I expected and the holding tweezer sank into it. Very
unfortunate to say the least. Thankfully, I was able to fill the sunk
areas with a 96.5% tin / 3.5% fine silver alloy that I normally use
as a solder that melts at 450F (232C). I then burnished the form back
to its original shape. I used the sterling and prong settings with
35% power and 3.5ms.
11/20/2019: Easy hole filling in thin material.
Sterling shoehorn with stamped, applied decoration. Material around
holes is thinner than .0005" - .001" thick.
Sterling tubing was inserted and cut. Tubing was used in order to
"throw" metal over the circumference of the holes to
increase the edges' thickness. Using solid wire wouldn't have
thickened to my satisfaction.
Pulsing from the center for the installed tubing enabled me to throw
the metal into the edges as opposed just over the surface around the holes.
Sterling wire was then used to more deeply fill the tubing without
blowing holes into the thinner decoration.
The filled holes were then polished with a fine silicone abrasive wheel.
Seen from another angle.
10/21/2019: The PUK is the best alternative when working with
mixed metals!
This mixed metal necklace came to me with the headed post missing. I
hard soldered a sterling wire to the disk and welded it to the back
of the dome. Soldering would have changed the color of the piece.
9/30/2019: Are you taking care of your PUK?
Use a Selvyt cloth to wipe the eyepieces and shielding glass under
the magnifier to maintain a clear view of what you’re welding.
Clean the rubber eyepiece surrounds by washing them in a plant-based cleaner.
Clean the nozzle of soot using a cotton swab and alcohol
Never put stress on the handpiece cord.
8/30/2019: Dealing with voids
These images came to me from a PUK 5 user. She was having trouble
with voids in her welds as seen below. The sterling metal thickness
is .5mm.
The settings used were: Alloy: Silver, Mode: Prong, Power: 18%,
MS: 1.5
Below is a sample piece I welded using these settings: Power: 20%,
MS: 1.5. I used a sharp electrode and placed in on the piece being
welded and pushed welding wire's tip against it. The heat drew the
wire and deposited it without any edge voids. Placing the
electrode directly above the wire and pulsing down may result in the
voids. If that's the case, place the electrode tip on the edge of the
puddle. Again, this will draw the material to those voids. You can
also angle the electrode 45 degrees directly above the puddle and
pulse outward toward the void. This will shoot the metal into void.
8/22/2019
Do your arms sometimes get fatigued when welding large objects? If
so, try resting your arms and the piece you're welding on a
pillow! For safety purposes I'm looking for some flame retardant
material as a cover.
6/4/2019
Keep the blood flowing!
Feeling pain your arm from welding? It may be from grasping the
object for an extended period of time. This leads to diminished blood
flow in your arm because of very little movement, which can lead to
tendonitis. I have a timer directly above my welder and it's set for
15 minutes. When the alarm sounds, I set the piece down and shake my
right arm (the arm I use when holding the object or the handpiece) to
get the blood flowing at a normal rate. I also do some shoulder rolls
(going backwards) remove any stress in my neck. Keep in mind that I
weld a lot of holloware, which can take substantially more time than
repointing a prong.
On a related subject, I do a lot of road cycling. When my hands are
on the top bar, my fingers are loosely draped over it, otherwise, I
would develop numbness in my hands and increased vibration up my
arms, which I keep slightly bent.
Keep a diamond file nearby!
It happens to all of us: we suddenly end up with a gob of alloy on
our electrode. Instead of removing it and replacing with a new one,
file the solder off while resharpening the tip. Removing this glob
will also make it easier to resharpen your electrode with the diamond disc.
Center line cracking
Dealing with center line cracking in standard sterling.
There may be times when you'll receive cracking even when welding
annealed sterling. If you have trouble trying to find a resolution,
simply use a pulse of some sterling/5% platinum welding wire. It will
meld with the standard sterling and produce a bright, crack-free weld.
Regarding air pockets
I'm doing some serious welding on a sterling punch bowl, and I was thinking...
Are you receiving numerous air pockets which lead to sputtering?
After making a deposit of whatever alloy you're using, place your
electrode on the edge of the "jelly bean" and pulse. You'll
see the bean will level out so that the next deposit you place next
to the "puddle" won't trap air. This pulsing levels the
bean because the alloy is following the heat of the electrode tip.
Think of it as brazing; the solder will travel to the heat. You can
test the solidity of your weld by pulsing over the entire surface. If
there are air pockets, they will make themselves evident.
5/29/2019: Welding with a dull electrode
There's a specific setting that lends itself to welding with a blunt
electrode and sterling/5% platinum or silver/palladium wire. I'm sure
it would work fine with JSS wire as well, but I have none left to
experiment with. Try this:
Alloy: sterling
Mode: wire
Power: 40%
MS: 3
Electrode sizes: .5 mm, .6 mm
3/2/2019: Stronger Welds
A strong, attractive catch starts with a 45° undercut and
pulsing wire into it (I used my sterling 50% platinum for strength).
So many times I have seen attachments that have been welded around
the edge displaying an unfinished appearance. I used blue, pink,
peach, and light green 3M radial bristle discs for finishing
(https://contenti.com/3m-radial-bristle-discs). I only welded this
one side. The catch itself is 4.5mm tall...
3/2/2019: Assorted Contacts
These are my most commonly used contacts. Notice that all the plugs
and contacts are coded for quick identification.
2/2/2019: Welding Electroformed Wax
This electroformed figurine required one of the more difficult
welding techniques as the silver on it is only .003" (0.076mm)
and it's covering wax. The first image shows the figurine at 13cm tall.
The second image shows where I inserted sterling wire at the top of
the figurine's left thigh where there's exposed wax. I continued
doing so until there is no more exposed wax. You can see where I
started to weld the wires towards the front of the thigh. I then
pulsed the wire onto the thinner metal so it won't blow holes into
the wax. So, the molten metal from the wire was literally being
thrown onto the electroformed silver. That 8mm area was eventually
leveled off with additional welding wire. I'm using the prong setting
with 35% power and 2.5ms.
12/20/2018: Thread Repair
This sterling flask came to me because the threaded top wasn't fully
engaging the thread. The silver deposits you see have not yet been
smoothed as I wanted you to see how I was building up the thread. To
see where the low points were that would require more silver, I used
a black marker and lightly screwed the top down. I used the
sterling/prong/35% power/25ms settings. Very satisfying!
12/3/2018: Quick and easy hole filling
Weld a wire from one end of the hole to the other then pulse
additional material onto both sides of the wire while backing away
until the hole is filled. Here I used .010" (.25mm) sterling/5%
platinum wire.
Settings: silver, prong, 35% power, 2.5ms
11/8/2018: Welding springs
My customer brought me this 1.5” silver-plated money clip which
had come apart. I had to weld one hinge holder back in place and
reinstall the steel torsion spring. Pretty easy, right? WRONG! When
attempting to reinstall, the spring popped out, hit the far left wall
and was never to be seen again s**t!
I had a stash of other tiny springs, but nothing as long as was
originally used, but at least the size was perfect. The problem was
how to compress all three springs to insert between both sides of the
money clip plates. Oy vey! After numerous attempts, even making
special pliers, it came to me: weld one of the two “arms”
of each spring in place on one plate, then, with the other plate roll
over the standing arms to push them down into place, then insert the
hinge pin! Brilliant (if I do say so myself ;~)! So, what you’re
seeing is three arms welded to the inside bottom plate. I used the
silver setting, 50% power, 20ms.
10/21/2018: The PUK: the must-have technology for restorers!
Have you ever had a job like the one below, where there was a split
that developed under some engraving? Well, that's exactly what
happened with this piece. The two images beneath the top one shows
what happened. The paddle material was extremely thin, causing the
split from constant flexing. If I had brazed the split, the solder
would flowed into the engraving itself, damaging the piece. And this
is where the PUK excels. I used a v-shaped graver and went over the
split just slightly so to not encroach into the engraving itself. I
then pulsed wire into it. This technique saved any engraving on the
top surface from being filled. I used the sterling setting with the
prong mode, 35% power, and 2.5ms. The filler material was stering/5%
platinum as the paddle was hardened.
9/19/2019: Andrew Berry demonstrates how to set-up your PUK5...
8/23/2018: Welding Stainless to Sterling – No Problem!
Below is a sheet of .022" sterling welded to a .038"
stainless wire (don't know the alloy). I used the silver setting,
thick mode, 50% power and 3ms. No filler was used. The welds are
bright and crack-free. This would be the perfect application for
attaching a stainless pig tail pinback to a brooch.
Creating a piece of jewelry using hardened material will last longer.
Why not try welding your entire piece rather than brazing?
As you know I do a LOT of pulse arc welding. If you've ever had
trouble welding sterling, this wire will increase your productivity
and give you outstanding results! These are the reasons I use
Sterling/5% Platinum Welding Wire on silver alloys and occasionally
other metals:
• Crack-free, glossy welds
• Best color wire for all silver alloys
• Stronger joints
• Melds well with other metals including silver solder
• Even works with dull electrodes
LEFT IMAGE: A ring of sterling .750” in diameter x .070”
thick and ½ hard. The ring had been deformed prior to rounding.
I filed an abnormally wide v-groove where both sides came together.
The reason for this was to see just how strong Sterling/5% Platinum
(alloy) was when used as a major element, not just as a minor filler.
Using a Lampert PUK5 welder, I filled the groove with the alloy to a
height of .060”, .010” less than the ring thickness. I then
rounded the ring over a tapered mandrel with a rawhide mallet
resulting in the image below. My findings while filling the groove
prior to rounding the ring:
1. Glossy, crack-free welds even when using a blunt electrode. I
discovered the same results when using both the silver and platinum
settings on the PUK5.
2. The alloy melded easily with the sterling.
RIGHT IMAGE: After rounding the ring, I cut the seam and polished one
edge to see if there were any welding gaps. There were none under 15x magnification.
2/20/2018: Stop marring your work (at least one side).
This is an alligator clip which I put three layers of shrink tubing
on one side, and ground down and polished the copper teeth on the
other. This way the rubber, not the teeth, will securely hold the
piece you're working on. I placed shrink tubing on the handle as well
because the clip can get very hot when welding at high power or milliseconds.
2/13/2018: Contact Strip
This is an additional way I use Lampert's flexible contact strip. I
cut the covering from the majority of the woven cable then put shrink
tubing on the end so it won't fray. I can then wrap the strip around
what I'm welding and hold it in place with a drawstring cinch like
you would find on a rain jacket. This is also more gentle than an
alligator clip!
2/8/2018: Tying off cable ends
Below is the back of a beautiful Mexican sterling neckpiece. It was
dissembled, polished, cleaned, then restrung with 49-strand coated
stainless cable. The cable ends were brought into the tubing and
sterling beads were crimped on the cable.
I then welded the beads to the tubing using the prong setting with
25% power and 2.5ms. I clipped the cable ends and used an ultrafine
silicone wheel to smooth the crimped beads so there were no sharp
edges, gave it a final polish, and degreased the area.
2/5/2018
The full line of PUK welding wires can be found here.
2/3/2018: An essential burr in your tool kit
I just purchased one of these knife
edge burs to grind out cracks in order to make them easier to
fill. I'm sure there will still be times when I'll use my gravers,
but this tool makes more sense, especially when getting into tight areas.
2/3/2018: Welding steel to copper
Yesterday my furnace flame went out. I welded this copper alligator
clip to a steel coat hanger using Argentium welding wire on the
universal and wire-feed settings. I then lit a match and fed it under
the furnace to ignite the pilot light. Cool!
12/14/2017: The advantage of using a "lazy Susan"
If you own a PUK articulating arm and would like more versatility
when welding, try welding on top of a lazy Susan (pictured in green).
You'll be able to rotate the piece with your wrists rather than
constantly raising and lowering your hands. On top of the of the lazy
Suisan I have a round block of wood, plastic container covers, and a
sandbag, all in place to give me options in welding height. The
microscope stays in a relatively constant position, allowing me to
sit up straight and not have to bend my neck. With this setup, I can
literally weld all day without pain, although, I occasionally get up
and stretch.
12/18/2017: Welding is sometimes your only good option
Below I'm welding small corner dents on this 2' sterling paneled
corner piece (one of a pair) for a gaming box. I even filled sharp
nicks on the panel faces. Hammering the dents out would have deformed
the flat surfaces, rendering the piece useless.
11/29/2017: Welding thin silver
This sterling coffeepot cover had
chased beads that were over polished leaving voids. The image on the
right shows those voids filled. I used the prong setting feature with
30% power, 1.5 ms, and smoothing mode for speed. After filling the
holes from the top, I flattened the resulting weld nodules on the
inside using the same settings.
10/5/2017: When a pulse arc welder is your absolute BEST choice
for a restoration
The cherub of this sterling bell had broken off at its left toes and
right ankle. Since it was originally brazed to the top of the
bell, the welder was my only consideration. I was able to make a
seamless mend using Argentium welding wire topped with sterling for a
perfect color match. Since the cherub was cast, Argentium produced a
much stronger join.
9/16/2017: When color is EVERYTHING!
The sugar shaker on the right
lost its top and the collector requested that I create a new sterling
piece using the salt top as an example. I made tubing and raised in
the top then welded a cap in place with sterling for a perfect color
match. I brazed half-round wire to the tubing and drilled the holes
before polishing.
9/12/2017: Filling engraving on a sterling Montblanc pen
PUK 5 Settings:
Alloy: Silver
Mode: Prong Tipping (This was a sterling barrel with plastic insert
which required a delicate setting).
Power: 30%
MS: 2
What I especially appreciate about the Argentium welding wire is that
successful welds without center-line cracking can be accomplished
with blunt electrodes, saving time. And as I mentioned previously,
this alloy offers impressive results when welding hardened sterling
and other silver alloys. And if you're lacking brass welding wire,
the Argentium works equally well when welding brass objects. Did you
find yourself short of stainless welding wire? Another reason to have
Argentium on hand!
6/17/2017: Gap-free ring shank seams
One method of welding ring shanks so there are no gaps on the back
side is to attach a very thin strip of metal to the back of the seam.
Run your electrode into the v-groove over the entire length of the
seam, melding the strip to the shank. Then fill the groove with your
welding wire. You'll notice there will be no gaps after grinding away
the strip after welding.
2/26/2017: Closing a ring shank
This sterling ring had been cut open and expanded for a larger
finger. I first closed the separation (left) and used a triangular
file to form a "V." I then welded the bottom of the V in
order to close the split. I filled the V with sterling using
.010" in the bottom half and .017" wire to the top, adding
extra for burnishing. The reason I used the larger diameter wire was
to fill the void more quickly. I filed the seam until there was a
paper thickness of metal from the shank. Next came light burnishing
of the top and underside to compress the silver. I finished with
2000-grit silicon carbide paper and bronze wool as a final finish to
blend with the rest of the ring.
2/4/2017: Filling large splits
The sterling match safe below required the striker split to be filled
with sterling. The thinnest material was .005" while the primary
body thickness was .015". I used .017" wire and placed it
on a slight angle over the void then positioned the electrode
directly over it, pulsing the wire into the approximate .040"
wide opening. The wire spread (sprayed) over the entire void. The
reason the thinnest material didn't vaporize was because the wire
temperature had lowered by the time it attached to those areas.
Before attempting this technique, experiment on a piece of scrap
silver to make certain you calibrate the proper settings.
11/19/2016: Pressuresplits
Sterling belt buckle splits aren't unusual because of the pressure
exerted upon them when securing the belt. This was the case below; in
fact there were breaks on both sides. I opened the splits with a v-shaped
graver and filled 3/4 depth with Argentium welding wire which made
the repaired area much stronger than using straight sterling. I then
topped it off with sterling for a perfect color match. And since the
hinge pin was a bit loose I decided to tack it in place so it
wouldn't come out.
10/21/2016: Why are my electrodes moving into the chuck as I weld?
1. Your chuck isn't tight enough. Apply more HAND PRESSURE when tightening;
2. You're using the larger chuck jaws which won't secure the smaller
diameter electrodes;
3. When installing electrodes, the oils in your fingers have been
deposited in the chuck jaws making them slippery. Remove the chuck
jaws and degrease them.
7/15/2016: Welding objects that have been hardened from
stamping or forging
This wrought sterling butter spreader snapped in two probably because
it was too brittle. This is another case where Argentium silver
welding wire had to be used because of the object's hardened state. I
filed all the edges of the break (front and back) to a point and
welded the blade to the handle with the Argentium. I continued
filling the gap until it was about 2/3 filled. Because the Argentium
color doesn't quite match that of standard sterling, I pulsed
sterling in the remaining 1/3 of the void then finished it with
2,000-grit paper and 0000 steel wool to match the rest of the piece.
6/8/2016: Do you miss the versatility of the three outlets you
had on the PUK04?
Don't worry, on the PUK5 you can piggyback the connectors...
5/15/2016: Testing the new PUK5: Welding Argentium Sterling
935 with Argentium silver welding wire
Two pieces of sheet were angled and tacked-welded at the top and
bottom corners prior to flooding the v-groove with the welding wire.
The sheet was then folded. (The line along the left edge of the weld
is not a crack.)
As with the previous test welding
Argentium using the PUK04, this test was also successful using the
PUK5 and it's programmed welding wire setting of 4ms and 45% power.
5/2/2016: Testing
the new PUK5
Last week I started testing the new PUK5 and
comparing it to the PUK04. The PUK5 sits to the right. Preliminary
testing compared to the PUK04...
* Smaller footprint;
* Simpler display;
* Single button control;
* Faster welding speeds;
* New "smoothing" feature flattens your
welds for quicker finishing;
* More comfortable rubber eyepieces on the
microscope (crucial for long periods of welding);
* More affordable: $4,795 (regulator included!).
The PUK04 base price was $5,295 not including regulator.
This Tiffany sterling ladle handle was missing its bird finial. My
customer found one that closely matched the original. Normally I
would have had to pin the bird in place, but all I had to do with the
PUK was tack it in a couple of spots then braze it and apply a patina
to give it an aged appearance. Prior to brazing, I drilled a small
hole in the ball to let out any moisture that may have remained
inside. After the brazing I welded the hole closed.
3/29/2016: Edging
This fused plate finial support was in two pieces and crushed. Being
sterling fused to a copper core meant that I had to add sterling to
the edge when reassembling. Normally, the sterling on the top edge
would have been burnished over the copper concealing it. The welded
sterling accomplished the same thing. Here the welding is in its raw
state prior to burnishing and finishing.
3/18/2016: Adding to a compressed casting
This is the top portion of an enormous cast sterling candlestick. It
had been dropped on its edge and dented. If I hadn't had my welder, I
would have had to cut sterling sheet and brazed it in place. Being
able to fill-in the dent went much faster. Since this was a
substantial dent, I used .020" (.51mm) dead-soft sterling wire
with settings of 9ms, the "thick" setting mode, and 65%
power. Welding time was approximately five minutes. All that's left
to do is blend the weld with the rest of the rim and polish.
1/29/2016: When there's no other alternative
The customer of this sterling inkwell wanted major dents removed but
didn't want to go to the expense of having me remove the plaster and
push them out. Not a problem, I just filled them in with sterling!
1/27/2016: The PUK5 makes its debut!
Get all the details here
on what makes this PUK even simpler to use.
1/5/2016: Make your electrodes last longer!
Are you looking to use your electrodes longer between changes? Try
grinding a longer taper and don't put a definite point on the end. If
you leave a flat that's .001" - .002" in diameter it won't
be blown off and you'll be able to use that point for a longer period.
12/30/2015: Welding Vermeil Filigree
This Chinese vermeil and enamel container cover came to me very sad
looking. The best way to repair it was to push up the right side of
the finial then cut the soldered connections around the middle. I
then reformed each "cup" over a dapping punch and welded
the connections with 14K yellow gold. Using any method other than
pulse arc welding would have been problematic because I would have
had to remove the finial stone and the plating would be
destroyed from the heat.
This was one of those "make it salable" jobs for an antique
dealer, so I made it look presentable without doing a full
restoration which would have been very costly.
10/9/2015: Welding sterling with inlaid enamel
This type of restoration was always tricky prior to pulse arc welding
since I would have had to use a low-flo lead solder.. The key fob
– which was only about two inches in diameter – had its
shield reattached twice with laser welders. The customer noticed that
I offered a different technology and asked if I would try it. Upon
receiving the fob, I removed the previous welded material on the
contact points so I could start fresh. I then angled the bottoms of
the feet so I could weld into and out of the bottoms, making a
complete connection to the ring. I gave the customer a on-year
warranty against the shield falling off under normal handling conditions.
10/6/2015: Another instance where tacking saved time
The plain portion of the handle on this 13" punch bowl (not
including the handles) had to be removed and dents filled with
sterling. (It was a casting that was too heavy to pull out the
dents.) Reattaching it required no binding wire or other holding
device, only four pulses with the welder to secure it in place. I
removed the handpiece from its holder and did the welding freehand
while looking away when I heard the "beep" – the
indicator when the capacitors are about to discharge. A liquid flux
was then applied to the seams and the bowl sprayed with liquid flux
via a Badger airbrush to prevent firestain.
8/11/2015: New alloy for welding standard sterling and
Argentium sterling.
Sterling test: There are instances when putting a weld under
stress is better handled by using a different alloy than what's being
welded. In this experiment, I beveled the edges of two flat sheets of
standard sterling. The starting dimensions of the sheets butted
together were .450" x 1.5" long x .038" thick. I
deposited Argentium laser and arc welding solder (76% fine silver)
into the "V." The sheet was bent on the weld to the form
what you see below, then polished along the welded seam. I found that
the solder performed at least as well as Lampert's palladium/silver
welding wire – with a better color and at a substantially
reduced cost. Remember, you can always leave a few thousandths on an
inch in the weld area in order to layer sterling on top for a perfect
color match. If you are interested in purchasing the solder, it's
currently only available from Cookson Gold
in the UK. Their wire is 1.44mm square and will have to be drawn into
thinner round wire. The material will soon be available as actual
welding wire from Rio Grande.
Argentium Sterling test: I used
the same technique using the Argentium laser and arc welding solder
on 935 Argentium sterling sheet (below), but this piece was hammered
flat after bending. Impressive.
7/72015: Working on objects containing lead solder and lacquer
There are times when no other method of restoration is practical
other than pulse arc welding. The piece below is a detail of the
Hartford Bishop's crozier. It came to me containing lead solder from
a previous repair and poorly applied lacquer. Two thistle elements
had become detached. I was asked to remove all traces of lead that
was used to solder the elements in place. The heat of the torch also
discolored the lacquer - what a mess. I was able to reattach the
thistles without further damaging the lacquer and coated those areas
with Renaissance wax. The crozier will have its lacquer stripped and
hand polished at a later date.
The image below shows the reattached thistles.
3/28/2015: Welding when contaminants are present on a piece
There are times when welding that no matter what you do, the weld
fails. Perhaps there are minute amounts of dirt on the inside of an
object that you can't see or remove. Maybe the inside of a piece was
never cleaned after brazing and corrosion developed. There may also
be areas that were repaired with unknown solders. Whatever the case,
here's a technique I developed when I had this very problem. I was
working on a double-walled sterling oil lamp which developed a small
hole allowing vegetable oil to leak into the basin. I removed over
two cups of oil, but was unable to remove the basin cover to
thoroughly remove the residue. A solder seam had opened and needed to
be welded closed. I removed the solder in the seam and hoped the oil
residue wouldn't contaminate the joint while welding. It did.
Whatever setting I used would allow the oil to migrate to the
surface. I decided to try something radical. I ramped up the
milliseconds to 20, chose the thick setting, and cranked the power to
60%. What happened, I believe, was the seam and surrounding area was
cauterized from the extreme blast. Whatever contamination was on the
inside of the basin disintegrated and the seam closed. I was now able
to continue welding with sterling wire on top of this clean material.
I would never recommend to a beginning welder to attempt such a major
step up in milliseconds and power, especially when working with
material thinner than .032" (.811 mm). I had been using 2
milliseconds with 50% power prior to the experiment. I would
recommend ramping the welding milliseconds and power gradually to see
how the metal reacts. What you want to avoid, at all cost, is blowing
a huge hole in your piece that will require a major repair.
I have provided a video
on making your own coiled sterling wire for Glenn Manning's Speedwire.
1/9/2014: Using prongs to hold pieces together
The piece below is part of a candelabra. A candle cup broke off of
one of the arms and had to be reattached. In this case, I didn't
tack-weld both pieces together because soot may have been deposited
inside the seam making it more difficult for the solder to flow. I
devised a method to hold the pieces together by tacking four wires
(prongs) to the bottom of the candle cup. I applied flux inside the
seam, assembled both pieces, then pushed the prongs over, securing
the arm. This enabled me to rest the tip of the solder wire
against each prong when the cup and arm came up to temperature,
allowing the capillary action to carry the solder around the seam.
After removing the flux I filed off the prongs.
12/17/2014: Extended use for Lampert's welding spool
Some of you may be using Lampert's welding wires. I generally use
their palladium/silver wire as they're the only company making it. If
you're drawing your own wire that's too thick for the Speedwire
system, re-use Lamper't spool! I ground away the tabs that hold both
plates together, drilled a hole through the inner walls so the
wire will stay still while winding, then installed a nylon 1/4"
hex head bolt, two washers, and a nut. Voila, a stable method
for holding your wire (in my case, below, it's .020"). The nylon
components are substantially lighter than steel.
11/23/2014: New Option for Attaching PUK's Flexible Contact Strip
The candlestick below had a stem that was too large for the flexible
contact strip to fit around and the other contacts would have left a
light mark on this new candlestick. I decided to use aluminum tape to
fasten the strip, eliminating the need to refinish the contact area.
10/19/2014: Tool repair. Have you ever dropped a cast iron
tool on a cement floor? I have. You cry a little then you reshape it.
Or, you braze some brass rod or silver solder to rebuild the tool.
Or, you can use your PUK! This cast iron spoon stake chipped when it
fell on my cement floor. I used the stainless steel setting on the
PUK and rebuilt the missing piece with some heavy mild steel wire,
then reshaped the repaired area. (Shown is the welded area prior to
finishing). There's no messy flux clean-up and you'll maintain the
finish on the rest of your tool – no repolishing. If you have a
very heavy T-stake with some porosity, welding will take much less
time and without heating a large area with your torch.
10/19/2014: This money clip broke on its spine from too much
stress. It was welded back together with palladium/silver wire and
built up around the break, adding strength. Welding was the only
practical option for this repair because of the inlaid stones.
Because of the tension exerted on the spring, silver sheet was welded
to the spine for extra support and tapered around the back for a more
appealing appearance
8/25/2014: Welding Objects With Hard Fired Enamel
If you ever repaired an object containing enamel, you know how
difficult it can be, especially if the object requires soldering. You
can't use silver solder because of the danger of damaging the enamel.
And lead solder won't give you a secure or attractive result, but
that's the only method available in your workshop.
If you create or restore enameled objects, you may want to consider a
pulse arc welder since the heat is so localized no harm will come to
the enamel. This pot needed its handle secured and its dents removed
from the single-walled body, double-walled cover, and removeable tea
strainer that sits under the cover. There had been a rod extending
through both ivory insulators. One end was hard soldered to the
handle and the other was peined over on the inside of the pot. Over
time, this assembly loosened. I removed both rods then welded new
ones to the body, covering the holes. I then drilled holes through
the handle for the rods to extend and countersunk the holes. After I
reinstalled the insulators over the rods, I attached the handle with
the rods protruding through the holes. I then pulsed down over the
rods, spreading the silver into the countersinks and securing all
parts for an undetectable repair (below).
7/25/2014: Welding Stress Cracks
One of the many strengths of pulse arc welding is the ability to
correct mistakes. For instance: you're at the final stage of checking
(thickening) the edge of a vase you just spent weeks raising and
planishing. Suddenly you discover a stress crack that formed down the
side of the piece because the metal became too hard. What do you
normally do to repair the crack after you're done swearing? That's
right, you solder it or start over with a new piece of metal. The
problem is if you use solder, the color difference will stand out
like a soar thumb. And this is where welding will save the day. You
file a v-groove into the crack and use a wire of the same alloy as
the piece itself and fill it in. You've not only saved hours of
production time, you've corrected a mistake that will never be detected.
As a restoration specialist, I have been confronted numerous times
with this issue. A bracelet or sugar tongs that were flexed so many
times a crack developed. Or a spun bowl that wasn't properly annealed
when made and cracked on its edge after hitting a tile floor. And
that flimsy 18th century goblet that was torqued when hand polishing
and cracks opened around its stem. It's very satisfying returning a
piece to a customer knowing that a new technology produced a better result.
5/20/2014: Welding results in brittleness in sterling
Are you about to size a ring? Be aware that if you're filling the
"V" you made with filler wire will be more brittle than the
rest of the ring. And I'm using a ring shank only as an example. On a
hardened shank, pulse a couple of layers of sterling in the
bottom of the "V" using 2-3ms, thick mode, and 50% power.
Add a couple of layers of palladium/silver wire for a stronger
connection to the shank and finish off with a thick layer of sterling
for a perfect color match.If you find that after welding you have to
size up a quarter to one half you should concentrate any hammer blows
away from the weld. This will insure that the weld will not split.
4/11/2014
2/28/2014: Welding a snuffbox hinge knuckle
Three-knuckle hinges should be easy to make, right? So why do I
constantly see them with the center knuckle smaller than the other
two? Strange. That center tube MUST be longer than the others so it
won't take added abuse.
This 2.75" sterling snuffbox is a case in point. That cover was
torn from the hinge. Removing the tight hinge pin would have damaged
the outsides of the outer two knuckles. This is where the PUK excels
in its duties. Using a triangular graver, I dug a groove between the
knuckle and cover on the top and underside. This allowed me to fuse
more material between the two components. I wanted to duplicate what
would have naturally occurred with silver solder's capillary action
drawing the solder between the two components. I fused one
thick layer of palladium/silver into the crevices since this alloy
would provide a stronger join than sterling. I finished by filling
the rest of the crevasse with sterling for a perfect color match to
the snuffbox. The images below show the deposited sterling prior to
leveling the area.
Below is the polished underside of the cover/hinge connection.
1/31/2014: Welding over multiple alloys (silver, copper, and lead)
Below is a fused plate cover to a Matthew Boulton urn. Fused plate
(commonly called Sheffield plate), was sterling sheet
"sandwiching" a sheet of copper. This was the precursor to
electroplating. In order for the cover and rim edges to be connected,
a very thin piece of sterling sheet (evident in the image) was lead
soldered to the edges, hiding the copper. If I used the same
technique to close those edges, the remaining strip may have pulled
away from the edge, so welding was the safest and most logical
technique to use. I cleaned the area missing this thin sheet and
proceeded to reconnect the cover and rim split with palladium/silver
wire. It worked brilliantly, as illustrated below. I will top the
filler with a heavy thickness of sterling for a perfect color match.
This is just one more reason I enjoy using the PUK.
1/15/2014: This money clip developed a stress crack then broke
from many years of use. It was welded back together with
palladium/silver wire. Removing the coin could have damaged it and
brazing the split would have softened the metal with no way to harden
the overall clip. Because of the tension exerted on the spring,
silver sheet was added to the spine for extra support.
12/27/2013: The PUK04 comes through again with a sensitive weld
This welder never ceases to amaze me! The perfume bottle top below
(actual length 3") was originally a button hook. My customer
wanted to use this hook in place of the missing top. I cut the hook
and inserted a sterling ball over the rod, then welded it in place
with sterling. Pretty straight forward, right? Well, not entirely.
You see, the handle was filled with pitch, so the challenge was to
weld the ball to the handle without any pitch melting and
contaminating the joint. I used a very sharp electrode with a setting
of 1ms, thick mode, and 35% power. The heat was so localized that the
welding went along flawlessly!
11/1/2013: Excellent source for .010 (.25mm) dead soft
sterling wire
Rio
Grande – Rio also carries other metals in the same form
as above.
10/5/2013: Electrode sharpening
We all have our own techniques when sharpening tools. Below is an
image of me sharpening electrodes in a very safe manner. When it's
time to sharpen my 80+ electrodes, I do so all at once. I cut a pipe
hold-down so I would need only one screw to secure it to my bench
over the inset 4"
galvanized elbow that connects to my dust collector. I use the
diamond sharpening wheel that comes in each package of PUK
electrodes. Using very little pressure from my forefinger on my left
hand, I quickly "twirl" two electrodes into (not away) the
wheel with the thumb and middle fingers of my right hand. Since I'm
primarily welding silver and using very little power, I grind
relatively slim tapers. Though I have ground as many as four
electrodes at once, grinding only two at a time will give you more
uniform tips.
9/25/2013: Removal of solder and plating critical when welding
I mentioned in an earlier post regarding removing silver solder from
a match safe before welding. Though
palladium/silver wire may sometimes fill without removing solder, the
absolute best and easiest welds are accomplished when solder is not
present. Another issue is the presence of a coating over the main
alloy, whether it's fine silver or rhodium covering sterling, gold
over sterling, and especially lacquer. Always scrape, abrade, or
chemically remove this surface in order to work successfully with the
underlying alloy.
9/16/2013: Removing a hand mirror handle dent
Today I'm working on a sterling hand mirror which has it
mirror-holding bezel lead soldered in place. So, how to remove a
handle dent (the customer didn't want any other work done)? In this
case, I drilled a hole in the bottom of the handle large enough to
insert a burnisher to pop out the dent in the middle of the handle. I
then pushed a no-hole sterling ball into the handle and had it drop
to the handle bottom, tacking it in place. Below you'll see the ball
totally welded in place before I add additional material and blend
the handle into the ball.
7/12/2013: Burnishing over a cast iron head
On objects made of thinner material, it's always best to support the
piece from underneath when burnishing so the area won't dent.
6/26/2013: Welding over firestain
Pulse arc welders don't like firestain; it sees it as an oddball
alloy and won't react well with it, producing an unsuccessful weld.
Remove all firestain from the welding area to expose the pure alloy
prior to welding, otherwise, it will be akin to trying to solder over
dirty metal.
6/10/2013: Filling in knife handle dents
Here I had a Georg Jensen sterling dinner knife that had been dented
on its tip. It was no problem filling in with a .020" / .51mm
wire. The resulting restoration is undetectable.
6/7/2013: Restoring internal threads
Yesterday I was working on a sterling candelabra that had a candle
cup with its internal threads worn down. I used Lampert's
palladium/silver wire to fill in the threads and retap the hole. This
saved considerable time over brazing a wire into the hole, drilling,
then tapping. The reason for using the palladium/silver was because
the threads had been hardened from numerous times screwing and
unscrewing the cup from its threaded rod. This alloy excels in fusing
itself to hardened silver, more so than standard sterling. I then
removed the stripped sterling rod from its arm (the bobeche disk is free-floating
over the arm), drilled and tapped a hole, then screwed in a new
threaded rod before welding it in place with the palladium/silver wire.
5/23/2013: The beauty of tacking
The silver creamer below illustrates just how easy and clean it is to
get parts ready to braze or solder. A few pulses from the PUK will
position the attachment without the fear of movement. No need to
worry about binding wire melting or a third hand moving the piece out
of place. Tacking this leg in a few spots took only 30 seconds.
4/12/2013: Engraving Cleaner
There are times when using a glass brush can be messy and even get in
the way of a good weld. Plus, the tiny fibers can get lodged in your
skin and can be very difficult to find. Today I made this engraving
cleaner which will free-up your flexshaft for other accessories. The
screw can be loosened and rotated to expose new material.
As with soldering, welding also requires a clean surface. This is
especially true with engraving, which can be very deep. When I see
oxide build-up (not soot), I reach for the cleaner. The cleaning will
also aid in void-free welds.
4/5/2013: Filling Engraving
This rare Jensen piece shows its chased lettering filled with
sterling (left). The image on the right shows the finished job. I
used 2ms, thick mode, 50% power. The material on this tankard allowed
me to use a more powerful pulse. Remember to always start with a less
powerful setting so not to blast through the object.
4/2/2013: Filling Engraving
Below is the bottom of a sterling creamer – part of a five-piece
teaset that had to have the monograms filled in. The material was too
thin to eradicate, and the customer wanted a replacement monogram
engraved. See more of monogram filling here.
Top left: I removed all oxide in the engraving with Wright's Silver
Polish and a horsehair brush (a typical flux brush). It's best to
start with a clean surface. I used silver polish since it's less
abrasive than a glass brush or 0000 steel wool.
Top right: the engraving being over-filled with sterling wire (I used
these settings: 2ms, thick mode, 50% power).
Bottom left: the monogram totally filled.
Bottom right: no trace of the monogram after planishing, abrading,
and polishing.
3/10/2013: Flattening filler wire
On my PUK bench sits a small anvil for flattening my .010" /
.25mm filler wire which comes out of my Speedwire
dispenser. There are times when I need a thin piece of sheet to fill
a narrow split.
3/9/2013: Skimming (my term)
There are times when you'll want to build a heavier thickness on top
of what you're welding. Below is a weighted candlestick with the
pitch still inside. Previous welds on this piece had not yet been
refined, as I simply wanted to get all holes filled first.
I'm using a much heavier .020" / .51mm wire on the edge of
<.005 / .127mm sterling. This is a fairly advanced technique, for
you'll want to position the electrode on the edge of the wire,
pushing a small amount onto the area beneath with a light setting.
I'm using the thick sterling setting, 1ms, and 35% power. This would
never be enough power to melt the entire wire, but will melt a
portion of it. This technique is also allowing for a much thicker
base to weld to without blowing through the thinner material beneath.
Using a heavier wire will cover the hole much quicker than using
.005" / .127mm, and will give me a much thicker base to add
heavier amounts of silver. Later burnishing will also result in a
smoother surface. Another plus in using thicker material will be
found in argon savings.
Below: The filled hole
2/21/2013: Smoothing deposited metal
I discovered this technique yesterday which allows me to free-up my
flexible shaft for welding accessories. This $20 Dremel electric
engraver, with its 9 power settings, hammers down, massaging the
metal while giving a beautiful smooth finish for light filing and
sanding. I removed the engraver point, polished the other end, and
reinstalled it. The engraver is very loud, so I wear earmuffs. I feel
the deposited metal is much less traumatized than when working with
many rotary burnishers which "pull" the metal instead of
compressing it like a rolling mill.
The area in front of the deposited sterling was finished with a #4
pillar file then 1200-grit wet/dry paper, ready for polishing.
I will start searching for a quieter electric engraver.
2/20/2013: Cast iron/sterling welding
Yesterday I made a hanger for my grinding wheels' truing device. This
is an example of successfully welding sterling to cast iron. It's not
a pretty connection (I wasn't concerned with aesthetics), though the
weld is extremely strong even though there is very little contact
between both materials. I used the sterling mode with the thick
preset. Periodically removing any soot from the welding area will
guarantee a homogeneous meld between weld layers.
2/7/2013: Stainless welding
I did some stainless welding today with no filler wire. The blade in
a dinner knife snapped off its tang. I removed the tang from the
sterling handle, welded its circumference, and made it ready for
reinsertion. If I had silver-soldered the two pieces back together,
there most certainly would have been some etching to the blade from
the flux. Cleaning of the tang and welding took all of three minutes!
1/8/2013: White metal welding
Up to now I've been demonstrating how fantastic the PUK is at welding
silver. You may remember the successful test I performed on pewter.
Yesterday I was straightening, leveling, and polishing a white metal
sailing trophy. One additional repair was required: reattaching the
ship's wheel. White metal generally melts below 300 F (149 C). Since
there was a large gap that required filling where the wheel meets the
handle, I used some higher temperature lead-free pewter which melts
at approximately 450 F (232 C). I used the sterling setting with a
time of 1.5ms, thick mode, 35% power. The pewter performed
beautifully, filling the gap and leaving a brighter color than a
traditional tin/lead solder. (I do no plating, so the pewter color
was a great substitute for a silverplated finish. Plus, this was a
repair, not a restoration project.) The pewter also gave me a
considerably stronger join. Gently bending the wheel back and forth
proved the welded areas were successful.
11/20/2012: Void-free welding
Below is an image of a piece of .040" (1.02mm) sterling sheet
that was built-up to a thickness of .105" (2.67mm) using
.020" (0.51mm) sterling wire. Notice the lack of voids do to
successful melding of weld deposits. I used a setting of 2.5ms /
thick mode / 45% power, pulsing over and around the sides of the
wire. I then dropped the settings to 1.5ms / thick mode / 45% power,
and placed the electrode at a 45-degree angle where the partially
melted wire meets the sheet. This allowed the wire to puddle, melding
with the sheet and leaving no voids. I then cut a cross-section with
a sawblade and finished the face with 2000-grit silicon carbide paper.
When building upon melted wire, make certain that there are no voids
underneath, otherwise, the area (when cut on a profile like the
piece below), will look like a sponge and will not have structural integrity.
I welded two pieces of .040" (1.02mm) sterling sheet together
with .020" (0.51mm) sterling wire, allowing voids (the dark
areas of the weld) to develop in the process. I then split the seam
by bending, demonstrating what can happen to a joint when not totally
filled. Insufficient power was used when the electrode was positioned
on top of the welding wire. The result was that portions of the
underside of the welding wire didn't fuse to the sheet.
10/22/2012: Using brass wire wheels
When using a typical 3/4" brass wire wheel in a flexible shaft
to remove soot and oxide build-up, use very little pressure and a
slow speed. Not doing so may leave brass residue on the piece you're
welding and will lead to an unsuccessful weld. Welding doesn't like
the presence of an addition metal which isn't part of the alloy
you're welding.
10/21/2012: Tools I use with the PUK
Front row, left to right...
Burnisher with slightly flat side, burnisher with slightly flat side,
burnisher with slightly flat side, three-sided burnisher, three-sided
burnisher, three-sided burnisher.
Back row, left to right...
PUK compactor (teeth were removed, slightly flattened side),
four-sided flexshaft mandrel (not pretty, but works well), 45-degree
heart bur for cutting grooves, burnisher with slightly flat side,
burnisher (top has a slight angle for "massaging" the
welded surface), graver for cutting grooves.
8/21/2012: Welding a Japanese waste bowl
containing lead solder
This is a double-walled fine silver waste bowl that had many dents.
The handles had disconnected from the rim because they were lead
soldered. I had to disassemble the inner and outer bowls, remove the
dents, reassemble with lead solder, repatinate, and hand polish.
I decided to make a stronger connection where the handles meet the
rim, so I welded the dragon toes with sterling (silver soldering
would have obviously melted the lead solder holding the two bowls together).
8/9/2012: Welding extremely thin sterling
Below is a close-up of a weighted candlestick. The customer didn't
want a complete restoration, but to simply repair the stem-to-base
connection without removing the dents. The candlestick material was
only about .004" (.1mm) thick. I was able to weld the split
closed with .010" (.25mm) sterling filler wire using the
following settings:
What's amazing is that I didn't have to empty the pitch to perform a
successful repair. Upon completion of the weld, I remelted the pitch
which filled in any voids around the repair.
7/26/2012: Protect alligator teeth from marring your work.
1. Grind down the jaw teeth
2. Anneal appropriate diameter brass or copper tubing
3. Force-fit tubing over jaws
4. Use round nose pliers to crimp new non-marring teeth
5. Roll over tips so they touch
6. Flatten and weld corners of tips
7. Slightly round tip corners
8. Polish tips
7/19/2012: Wallace Sterling Golf Trophy – working large
Filling in dents and welding cracks. I have the trophy sitting on a
rolling pneumatic table that can be height-adjusted. I constructed
the table out of an old office chair, removing the seat and replacing
it with a piece of plywood.
6/272012: 10" Tiffany Sterling Plate
This plate came to me with chased
lettering that the customer wanted removed and the overall look
brought back to its original beauty. This job was going to very
complex. The lower parts of the lettering were very thin as it was
chased on a steel form, and the slightly rounded corners would be
more difficult to level with the overall disk. These factors required
numerous setting adjustments on the PUK.
Above, I'm flattening the
over-filled sterling mounds with a special smoothing mode. This
entire filling and smoothing process was extremely time-consuming,
requiring enormous concentration and constant refocusing of the 10x microscope.
The lettering completely filled.
The deposited sterling was then
planished over a slightly domed stake to remove any porosity left by
the welding. Then, 600-, 1200-, and 2000-grit silicon carbide wet/dry
paper was used to remove any high spots and prepare the surface for polishing.
The center disk shows no sign of
ever having been chased.
The plate was repatinated and
lightly polished, resulting in a dramatic transformation. The entire
restoration took over 14 hours!
5/30/2012: Sterling Kiddush Cup
This Kiddush cup was made from very thin material. I reshaped the
torn area which extended 3/4 of the way around the stem. I then
brought together both sides of the split and welded them together.
All voids were filled by welding with sterling wire for a perfect
color match. I straightened the stem and leveled the bottom and top
rims. I then removed the dried polish and performed a very light hand polishing.
5/10/2012: Welding Objects That Flex
I often receive broken sterling flatware for restoration. Welding
these stamped (hardened) pieces back together will result in cracking
on either side of the weld due to the flexing of the utensil. This is
due to differences in grain structure of the stamped object and the
welded filler wire. I recommend using a mini-torch and annealing the
very edges of the break. Then file a v-groove on the backside of the
break and use filler wire (e.g. sterling for a sterling fork) to fill
the groove. This technique makes for a homogeneous connection.
5/5/2012: Argon Consumption
There are many things about the PUK I enjoy. One of those features is
the very low argon consumption compared to other systems. I find that
I can perform 99% of my welding using only 1.5 liters per minute (lpm).
5/5/2012: Sterling & Amber Ring
This is going to blow you away! A friend came to me with an amber and
sterling ring. The amber was glued into the setting with decorative
wires above, only 1/16" from the amber. As you can see below,
the wires had come apart. So, I couldn't remove the stone, and was
forced to weld the wires back together (I would have chosen to weld
them regardless of whether or not the stone could be removed). If I
had used a laser welder and missed the mark, the stone would have
fried. But first, I wanted to try the technique I was about to use on
a sterling jump ring surrounding a piece of plastic. It worked - no
harm came to the plastic. Here's the procedure I used...
The wires were pried open and the silver solder removed.
The wires were then sprung back together. As a precaution, I slipped
four layers of index card stock between the wires and the amber to
prevent the stone from burning.
Below are the wires reattached with sterling filler wire. I used the
filler setting with 1.5ms and 30% power.
4/16/2012: Sterling Box Cover
This box cover's four corners
were all split. I used sterling filler wire on the inside and
outside, then compacted the material from the outside to remove any
porosity. What appears to be a corner split in the third image is
actually a reflection
3/25/2012: Sterling Bracelet
This bracelet wasn't the thinnest
piece I repaired with the PUK, but it did present a new issue: How
would pulse arc welding hold up to constant bending?
This was the procedure I used:
The split was thoroughly cleaned,
then beveled on the back side. I used .010" sterling filler wire
and over-filled, spreading and smoothing material on either side of
the break to strengthen the area. If I had not added additional
support, I would see this piece back in my shop in a short time. I
didn't totally compact the filler metal as it would have become too
brittle with the possibility of the split re-opening. I decided to
simply burnish the surface to remove any surface porosity. This left
the filler material a bit more flexible.
12/30/2011: Sterling Casters
Someone had the clever idea to
engrave these 1730 caster bodies with "salt" and
"pepper." (The tops were left off to show a larger area of
the engraving.) Engraving the function of these pieces is certainly
not something I would have done, but to each his own. Since the
silver was too thin to remove by filing, I used the PUK and sterling
wire to fill it in. When I photographed the "after" image I
had not yet polished the bottom sections of the casters.
12/11/2011: Sterling
Cut Glass Jar Cover
This 5½" Wallace
sterling cut glass jar cover was stamped and spun out of extremely
thin material. The image on the left shows light coming through three
areas of a flower as well as other areas on the piece. These areas
were worn through from over polishing. The edges of the open spaces
were the approximate thickness of a piece of tin foil (.001"). The
PUK worked beautifully, and I used .25mm sterling
wire for a perfect color match.
11/18/2011: Heat-sensitive Stones
Question from jeweler: I recently purchased a PUK Pro welder
and am contemplating a retipping of a Tourmaline. I've completed
several successful repairs upon Diamonds and Rubies but haven't
worked on softer, heat-sensitive gems. Can you share any advice or
point me in the direction of any technical material?
Answer: Tourmalines are inherently fragile stones. Having said
this, there should be no problem rebuilding a prong. Firstly, it is
advisable to try this technique on a practice setting holding a
faceted glass "stone." Use 36-gauge annealed wire
(.005") and the lowest possible power setting on your PUK when
welding. Welding from the outside of the setting (don't let the
electrode pass over the glass), build the prong straight up with the
filler wire. When you're happy with the height of the prong, finish
it and gently push it over the glass.
11/4/2011: Standard Sterling & Argentium
I did a comparison test using .030" (0.76mm) sheet standard
sterling and Argentium. I used the gap mode with 6ms and 45% power
for both alloys. The standard sterling (left) had smaller and
slightly rougher welds than the Argentium, and demonstrated more
oxide formation. The actual weld diameter sizes were .030"
(0.76mm) for standard sterling, and .040" (1.02mm) for the
Argentium. Dropping the power to 30% when welding the Argentium gave
the same size diameter weld as the standard sterling.
Conclusion: Argentium gave a cleaner and smoother weld with 30% less
power consumption as compared to standard sterling.
Standard
sterling
Argentium
11/2/2011: Pewter
Today I experimented with welding metals other than the sterling I
normally work with. I cut some lead-free pewter sheet that was
.040" (1.02mm). I filed the edges of each sheet 90 degrees to
make a butt joint. I then used the PUK's gap filler mode with a
setting of 6ms and 35% power, running down the center of the joint
and overlapping each weld 50% I welded the top and bottom of the
joint, with sheet penetration of over 50%. I then sawed through the
joint and used 1200-grit silicon carbide paper to see if there were
any gaps and found none. I folded the sheet on the joint in half from
front to back, then back to front, and found no stress cracking. I
continued the folding back and forth which eventually resulted in
joint failure. This was because the joint was more brittle than the
rest of the sheet. The same failure would have resulted if I had used
pewter solder.
Since I was in an experimenting mood, I used the same PUK settings
and welded the pewter to the aluminum backing of a safety edge blade
with excellent results. The aluminum was then welded to the steel
blade - this, too, was successful.
Two butt-welded pewter sheets (1.125" wide total)
10/15/2011: Restoring a Gorham Sterling Match Safe
The most tedious repair on this
safe was closing the seam (or joint). The first order of business was
to open the seam to remove any solder. Ultra-fine 0000 steel wool was
used inside to remove any grime around the seam, making the surface
smooth for burnishing.
Here I'm raising the seam past
it's normal state, enabling greater access for scraping the seam walls.
This modified dental tool has a
narrow triangular scraper on its end. It is used to remove all solder
in the joint so the filler wire be welded to the clean sterling.
Pulse arc and laser technologies will not fuse successfully to solder
that previously melted. The filler metal will combine with the
existing solder and produce a grainy alloy with a color that doesn't
match the surrounding material.
Cleaning around the seam with a
fine glass brush will aid in successfully filling the joint.
The joint is now tapped closed
using a rawhide mallet. There still exists a very slight taper from
the bottom of the seam to the top, which will enable me to deposit
sterling filler wire.
Here, a pulse arc welder is used
to close the seam. This technology enables me to use .005"-.010"
diameter sterling wire on this repair as opposed to brazing with
hard silver solder. Silver soldering would have taken much
longer: fluxing the piece to prevent firestain, clean-up of the
solder joint around the chased detail, and extensive repatination.
Pulse arc welding localizes the heat and surrounds the weld area with
argon gas. This gas totally eliminates oxides from forming in the sterling.
The joint after welding.
A rotary compactor is used to
hammer down and compress the sterling wire that was used for the weld.
A fine rubberized abrasive wheel
removes any compactor imperfections.
This is the result before repatinating.
PUK 3s Professional
Video of welding the match safe above.
9/22/2011: Sterling Pie Server
This problem normally would require me to remove the plaster from the
handle making sure it's perfectly clean before brazing. I would then
have to go in with a scraper and clean around the split to guarantee
a successful brazing job. Most handles I repair contain pitch which
would have to be fully emptied so to not contaminate the joint (Arc
welding and laser welding would have produced enough localized heat
to melt the pitch, contaminating the seam.) For this handle, I
experimented by removing only the plaster that was attached to the
underside of the ragged split (approximately 2" in length) and
left the remaining plaster in the handle. Also, I didn't remove the
solder from the seam - arc welding and laser welding technology
normally wreak havoc when working with solders, but I was curious to
see if the PUK would give me a different outcome. I cut a piece of
annealed .005" sterling sheet and used it as a shim in the
split, exposing about a 1/16" above and below the surface. I
then clamped the two sides together and began welding using the PUK's
gap filler mode. Positioning the electrode on the top edge of the
shim, I was able to melt and "push" the sterling down into
the split, successfully filling the most of the void. This process is
completed within milliseconds. I then used .010" annealed
sterling wire to fill any remaining voids. The end result displayed
absolutely no porosity and was undetectable. There was no
firescale or firestain to remove, no patina to be reapplied, and a
seam that would never split again.
Avoiding Pain When
Welding for Long Periods
Les Hubert,
Licensed Massage Therapist
The job of a
silversmith or any other metal worker demands precision. And this
comes with a price if the artisan's hands and arms are called in to
provide that precision. With the cooperation of silversmith Jeff
Herman, I was able to observe just such an occasion. Jeff
informed me that he had been experiencing forearm pain and that this
occurred during and after intense concentration with the use of a
pulse arc welder. In order to use this device correctly, one has to
hold the object being worked on prolonged periods with micro
movements. In the following photo, the red ellipse indicates where
his pain is located. This pain is caused by a condition called
lateral epicondylitis, commonly referred to as tennis elbow.
In this particular
case Jeff is asking his muscles to make constant micro movements,
where they are at a disadvantage after prolonged periods. Muscles
need to adequately contract and elongate in order to pump out fuel
waste and bring in fresh fuel. When they are unable to do this,
lactic acid builds up in the muscles and connective tissues, creating
micro tears. To illustrate, imagine an elastic band that has been
burned. Instead of elongating when stretched, its fibers will simply
separate and tear.
Below is a video
of welding a large object illustrating micro movements of the arm.
With this
condition of tennis elbow, one can also find pain leading to the
thumb because of the radial nerve that lives in the area between the
larger extensor muscles of the forearm (see diagram).
Treatment Suggestions
If you are already
having problems with these areas, I suggest getting treatment with a
licensed professional such as a massage or muscular therapist or
physical therapist as soon as possible. If that's not possible in the
immediate future, then ice should be applied to the affected area for
at least 20 minutes (see photo to right).
Then remove the
ice and move the forearm slowly in a circular motion (demonstrated in
the video below) for one minute. Repeat this process two more times.
Cryotherapy or ice
therapy can quickly help control swelling and pain. Combined with
movement it can aid in removing some of the scar tissue in the
affected area, thus allowing the body to replace the scar tissue with
new and healthy fibers.
How to Avoid
this Condition
When your work
demands a steady hand, give yourself plenty of stretch breaks. Every
half hour isn't a bad idea. Try mildly ringing out a towel, raising
and lowering a weight (I used a sledge hammer that has a hanging hole
in the handle), or squeezing a soft ball to aid in lactic acid release.
Try to keep in
mind that your body has limits of endurance. It's an incredibly
complex and beautiful organism. With your help, as with any
tool, if properly maintained, it will continue to serve you well for
many years.

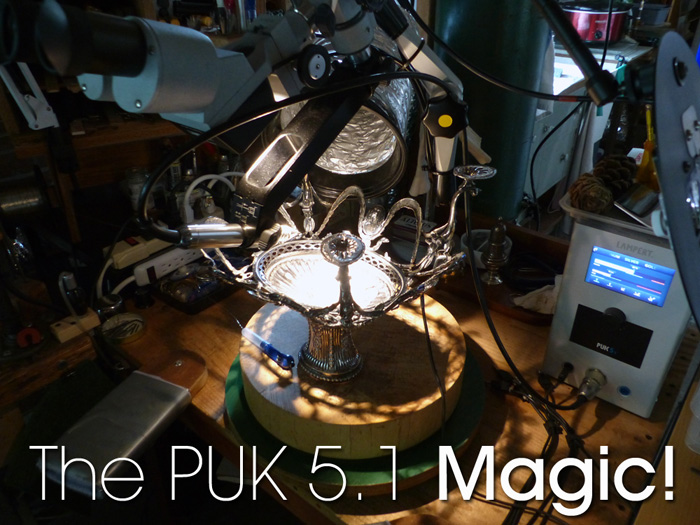
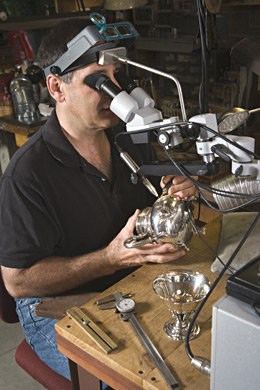
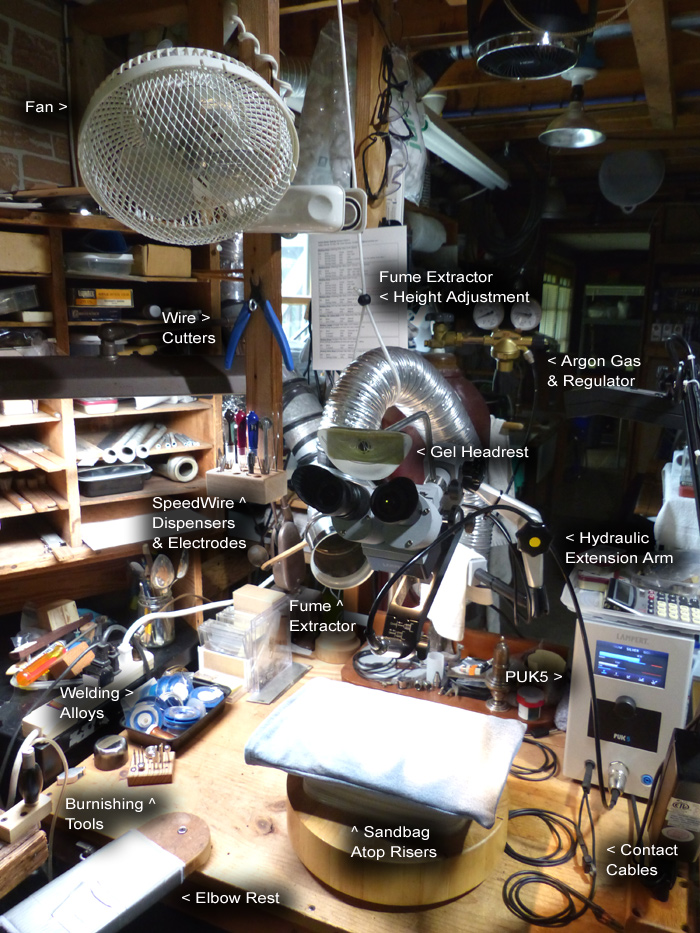

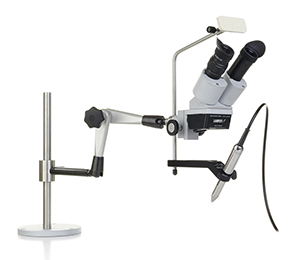
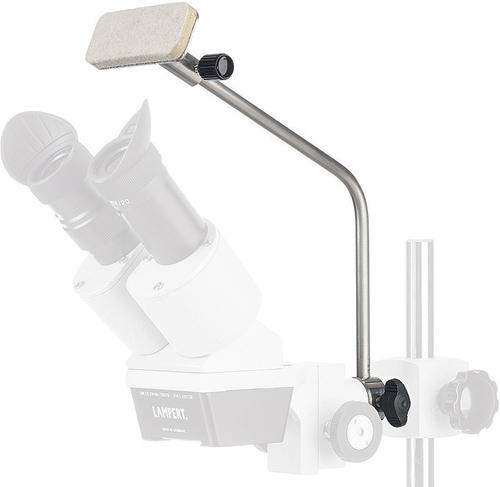

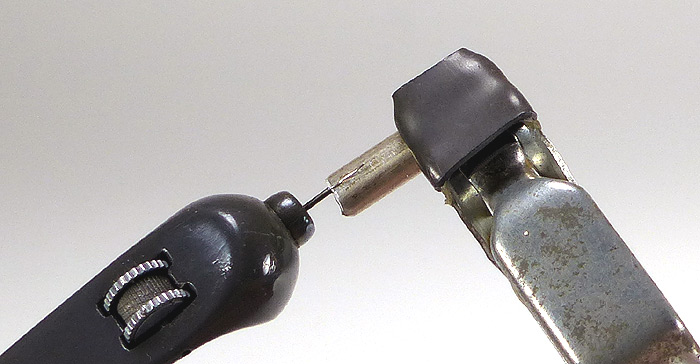
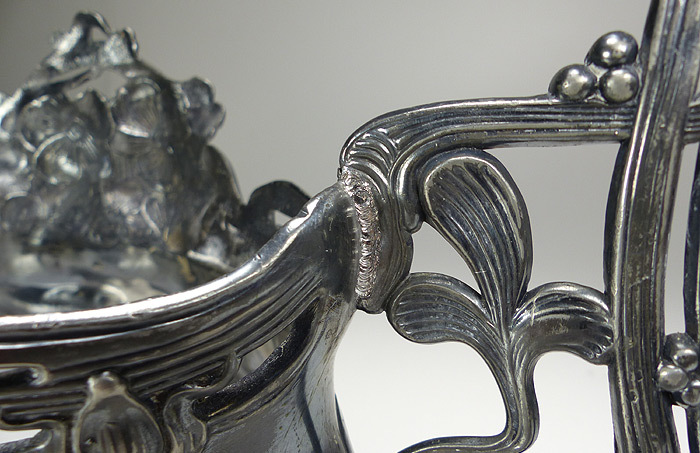
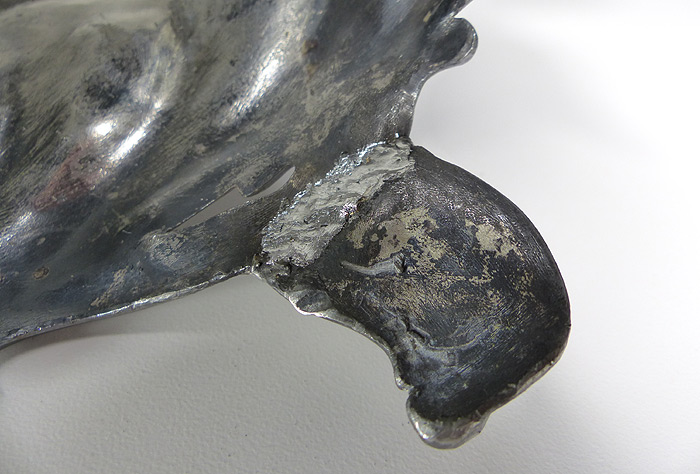
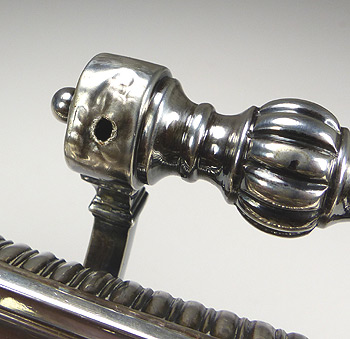
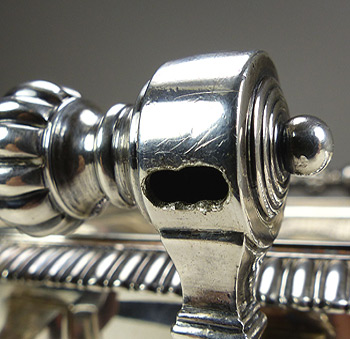
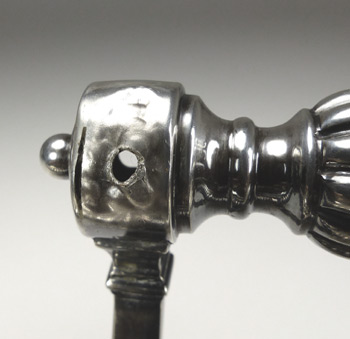
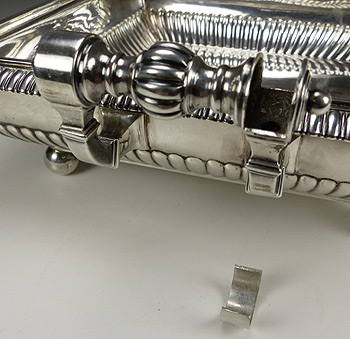
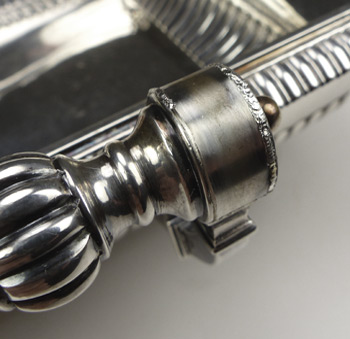


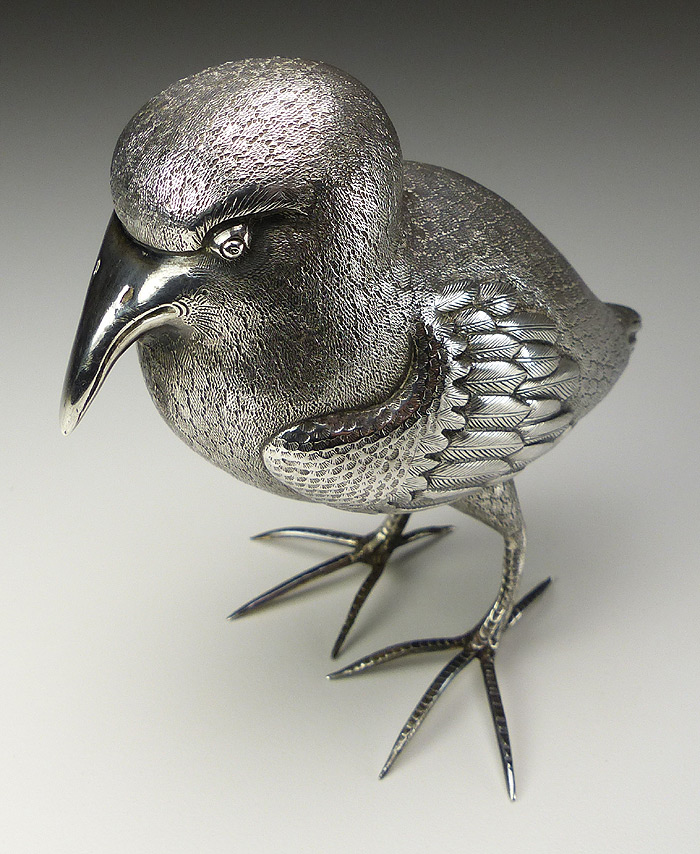
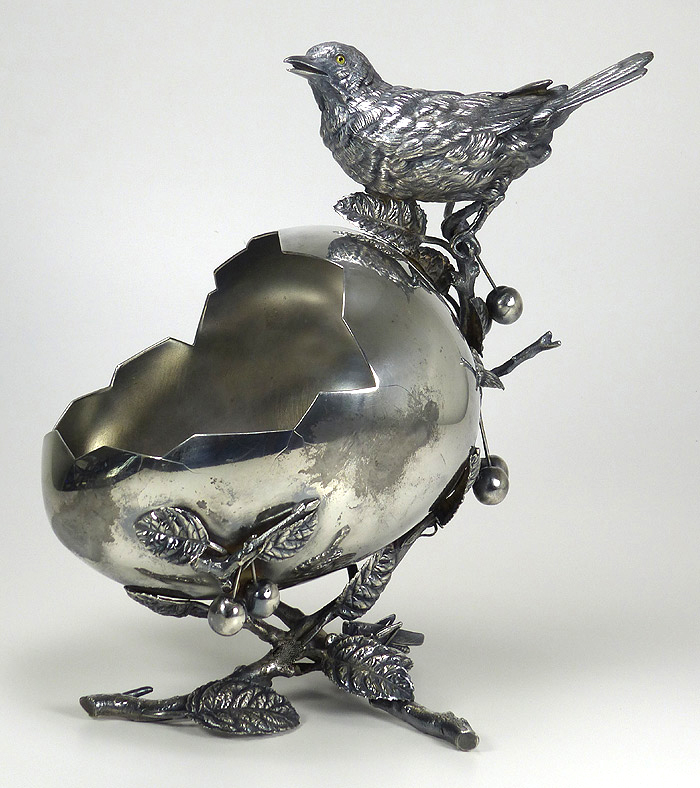
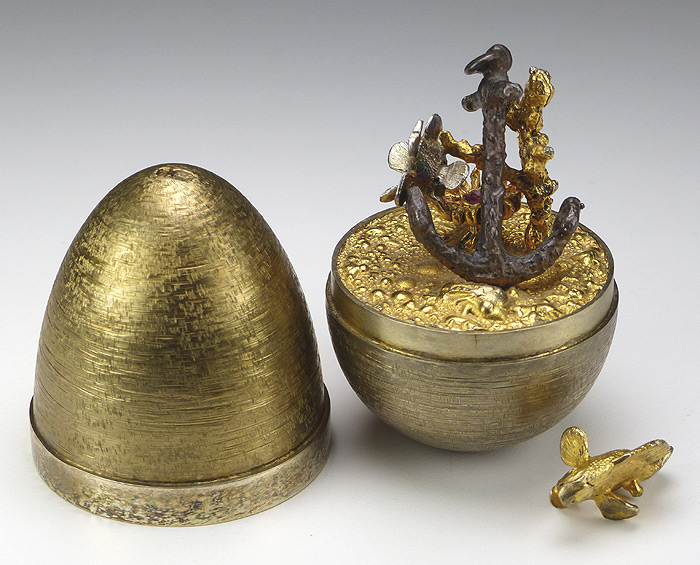
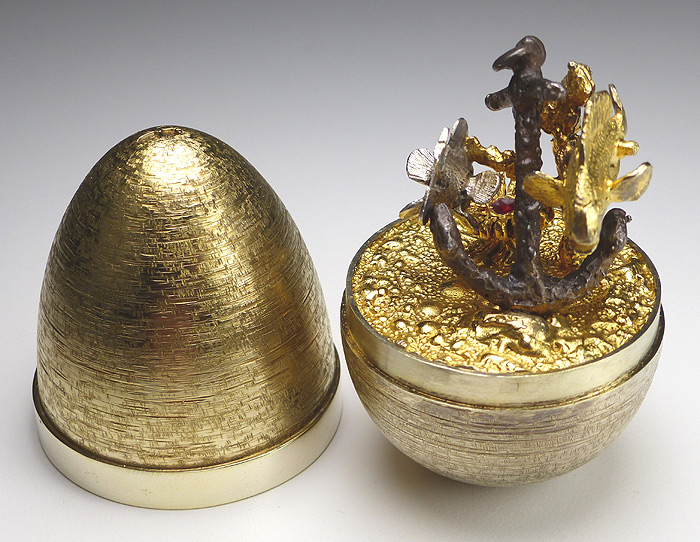

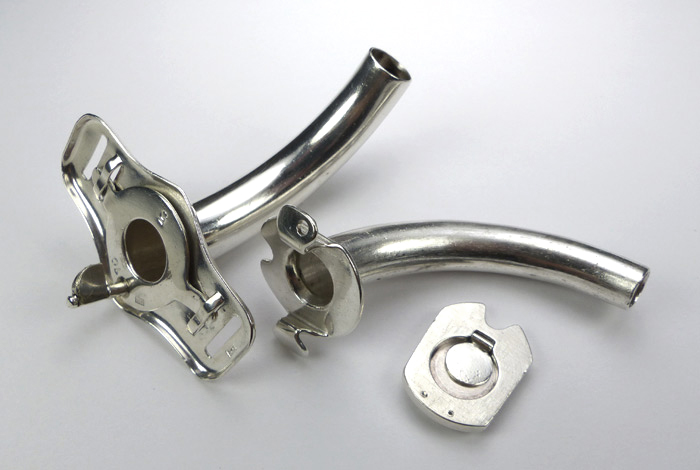
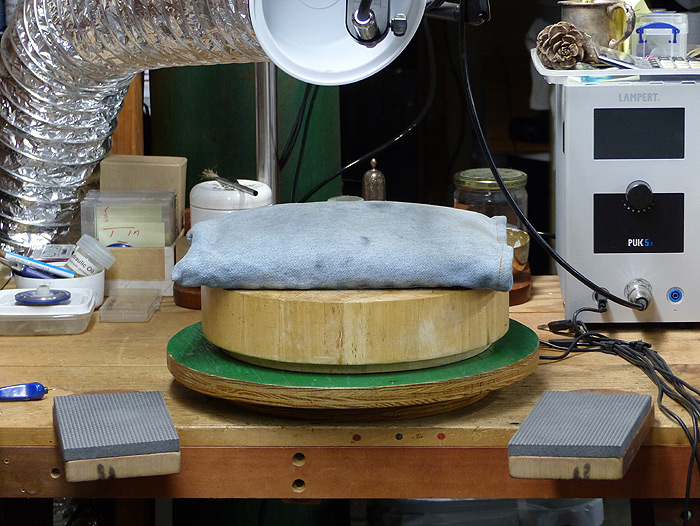


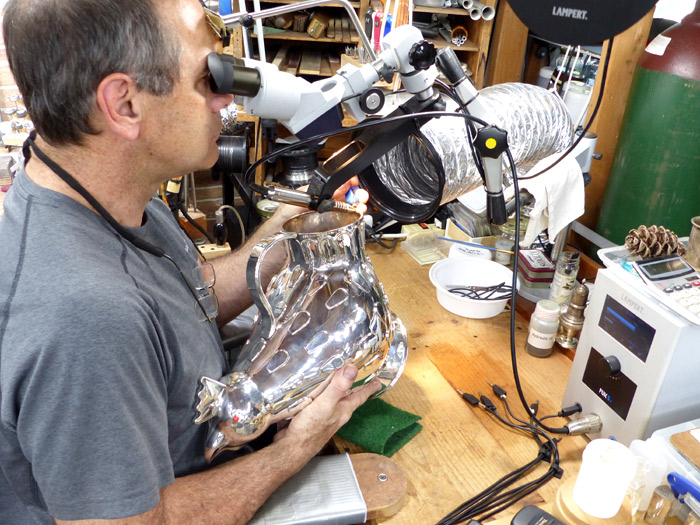
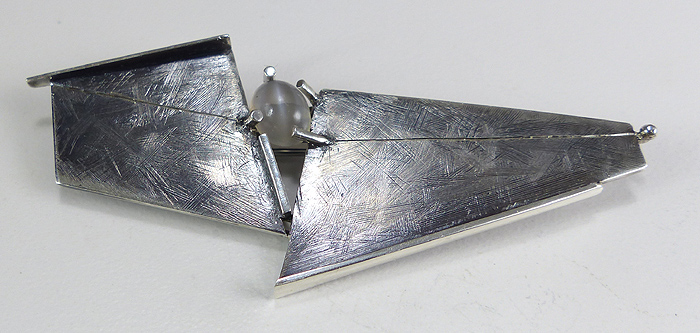
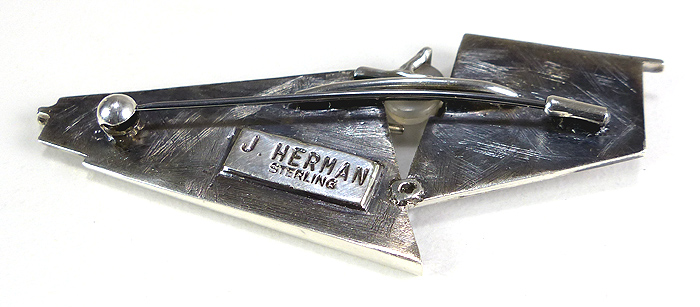
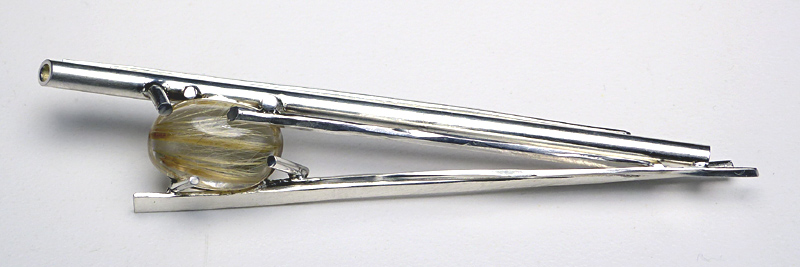
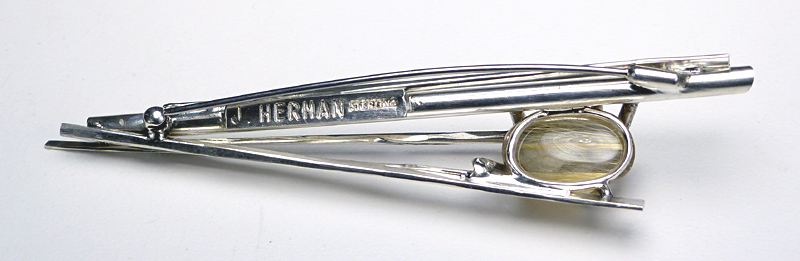
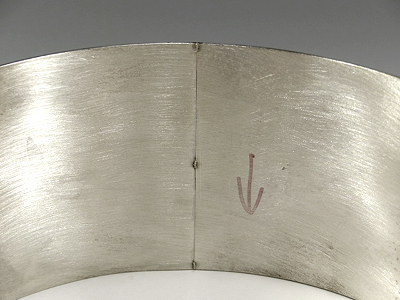
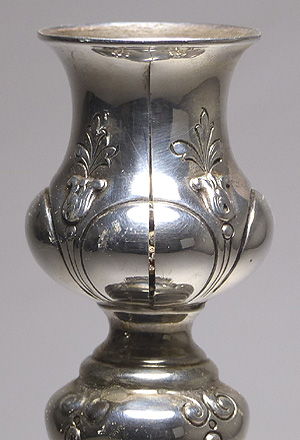
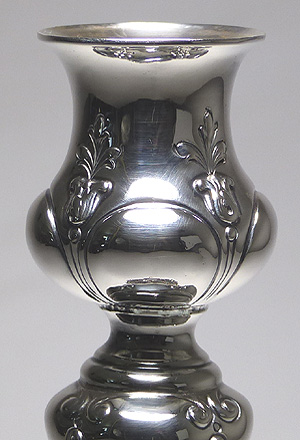
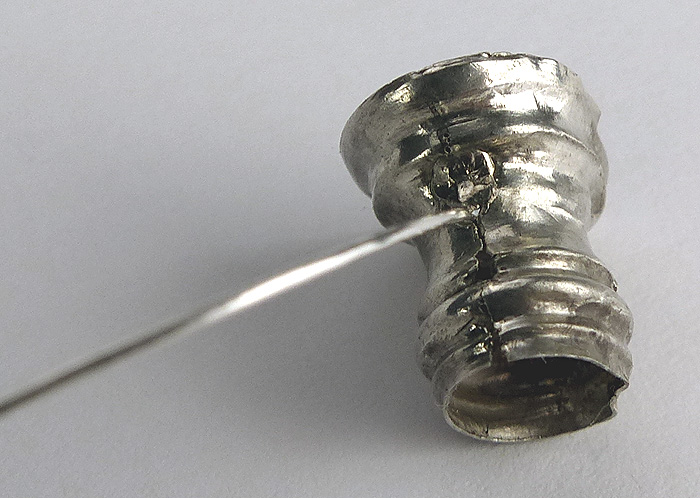
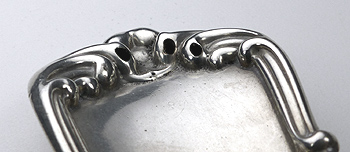
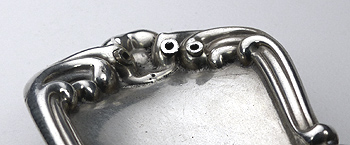
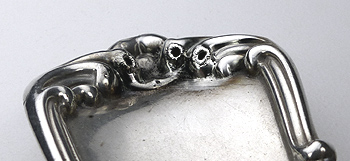
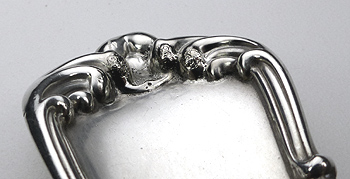
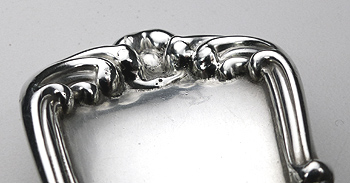
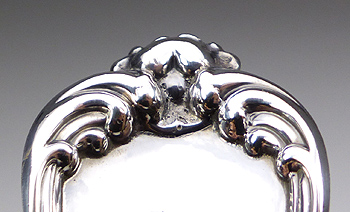
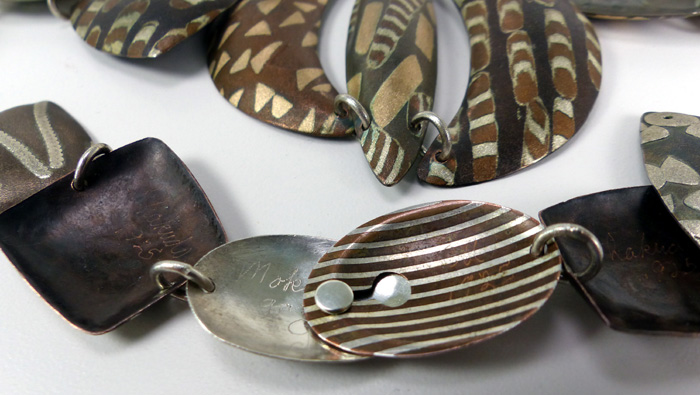
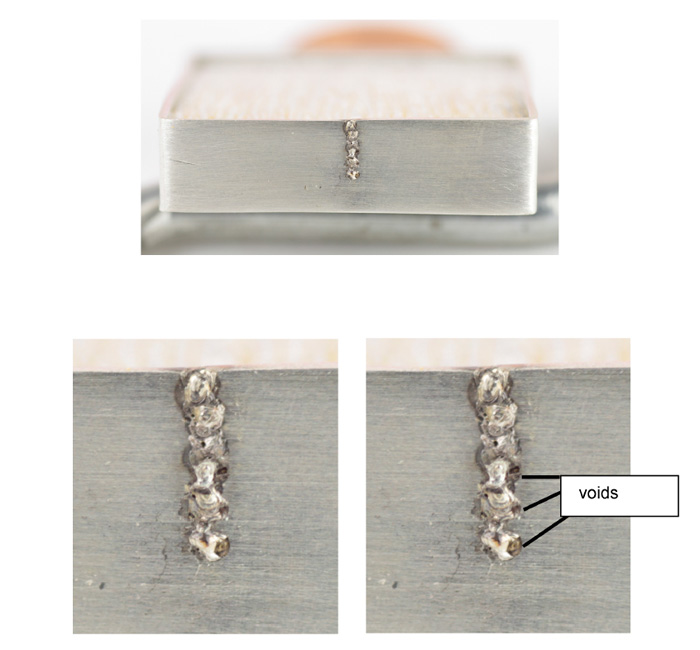
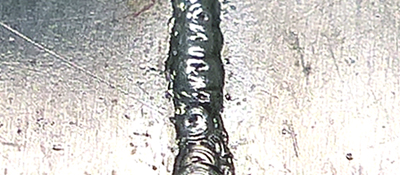
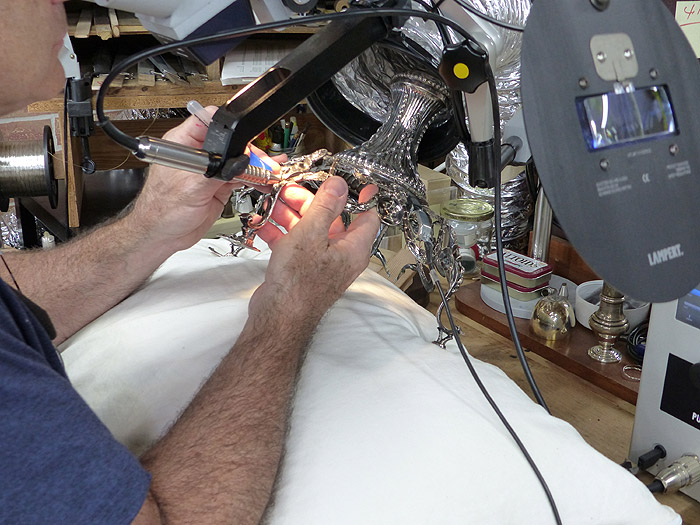
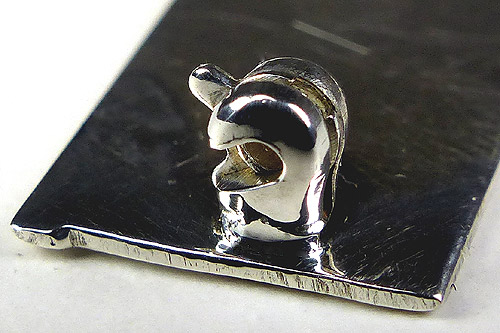
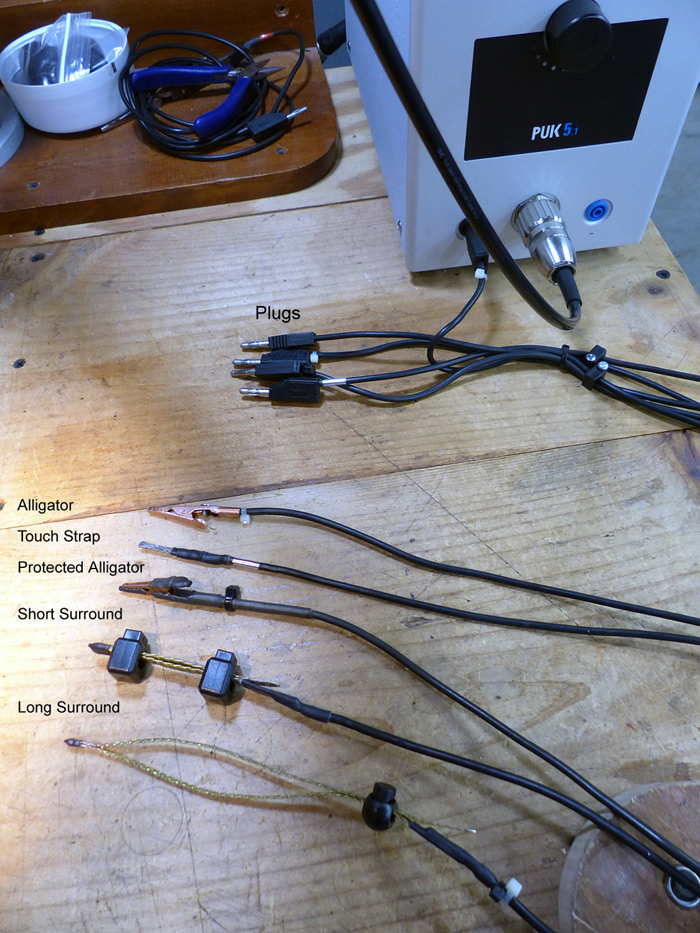
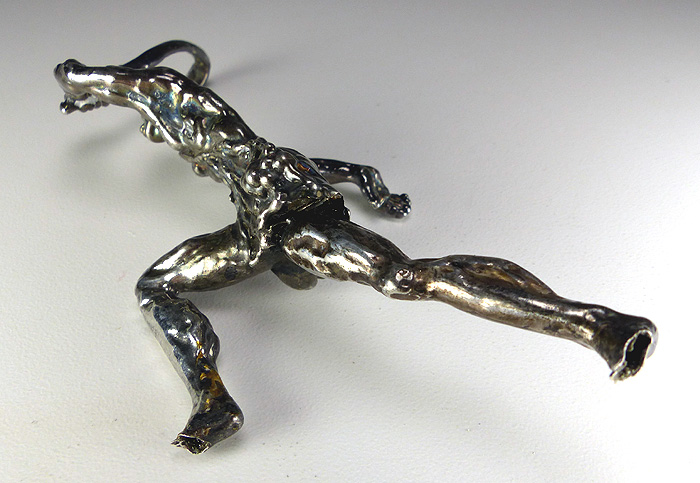
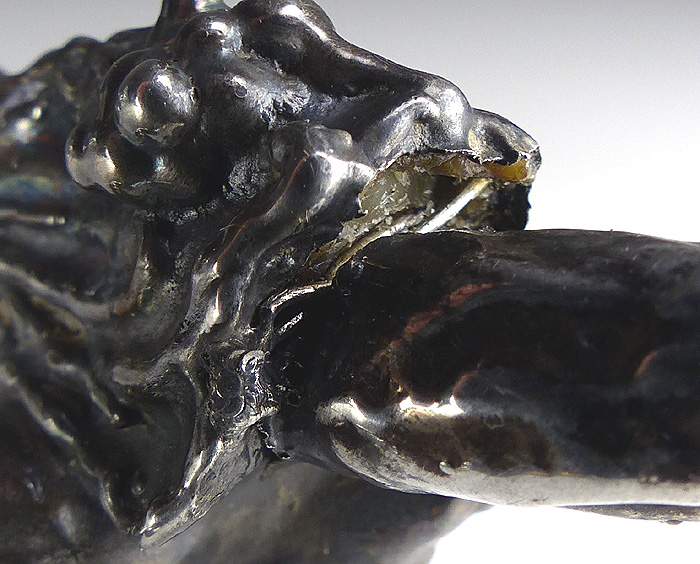
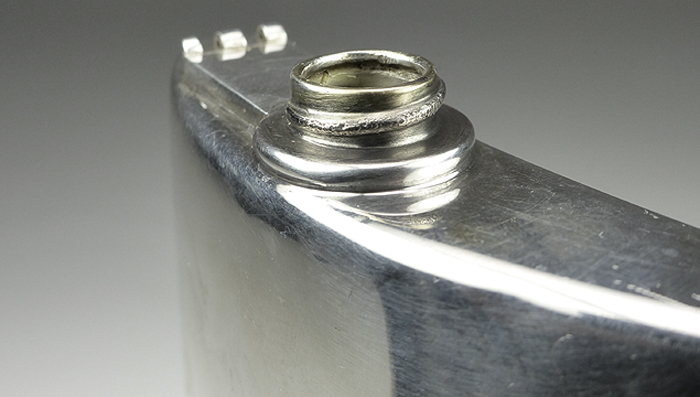
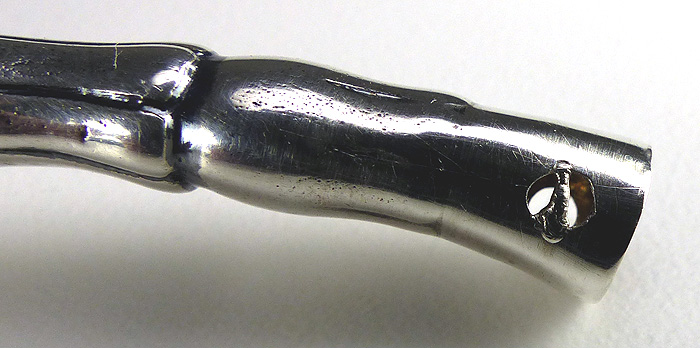
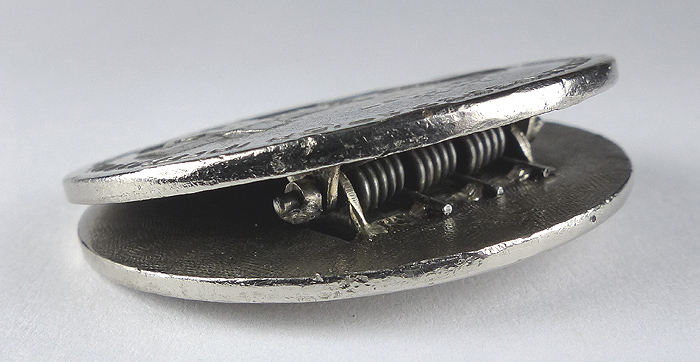
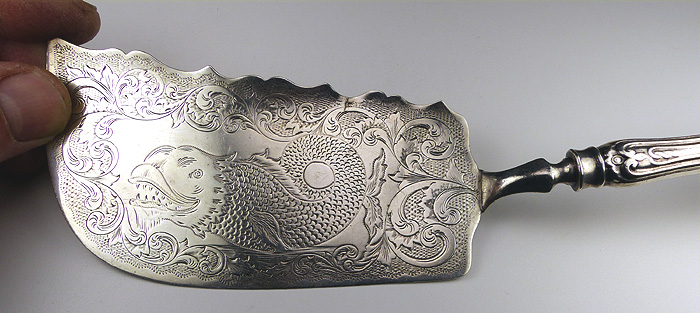
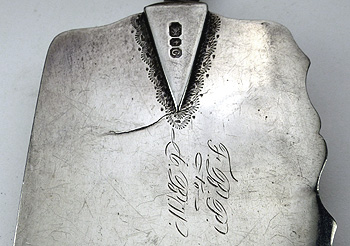
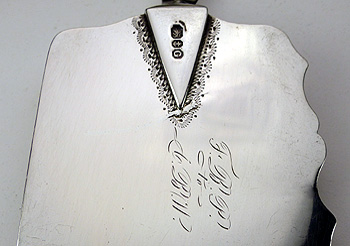

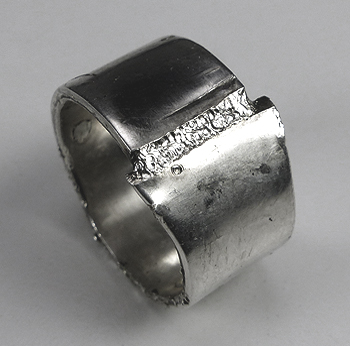
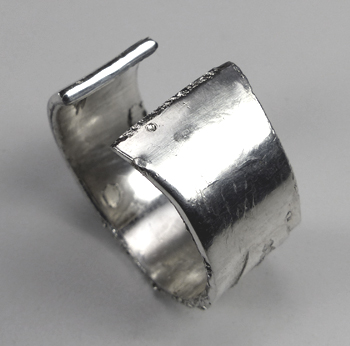
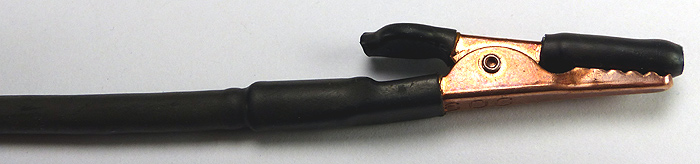
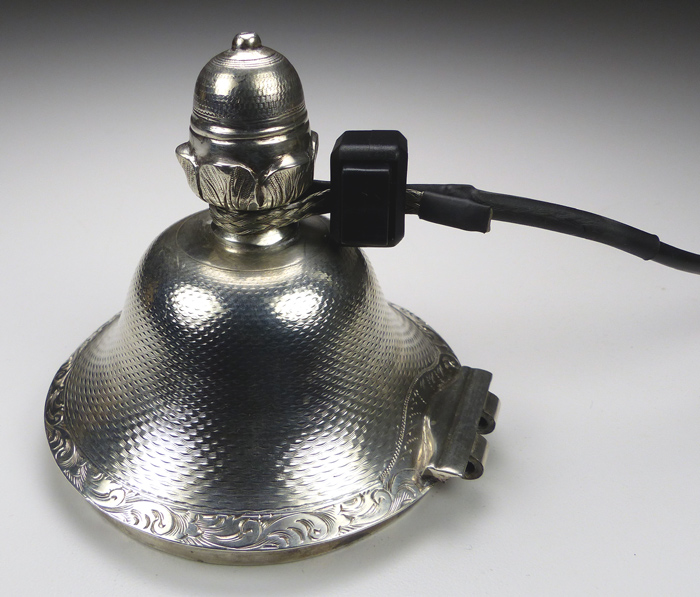
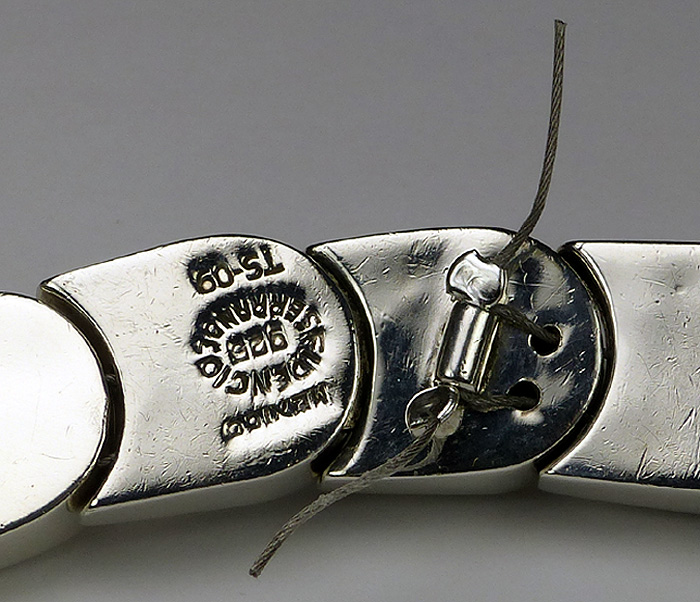
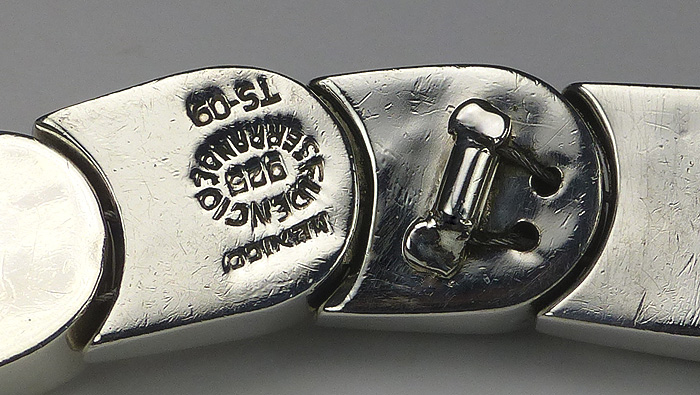
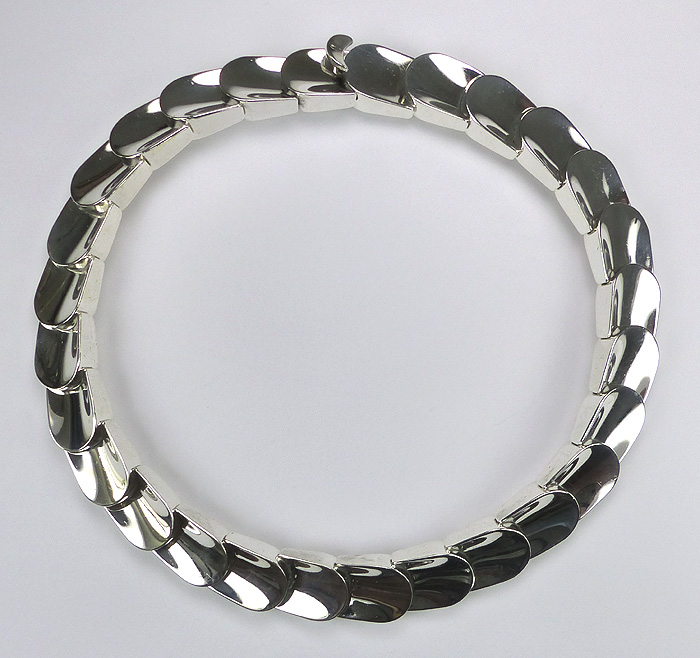
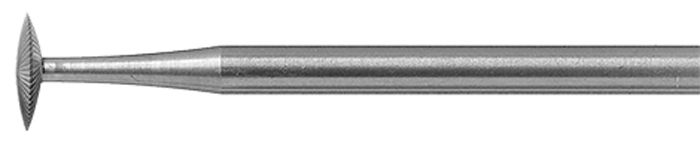
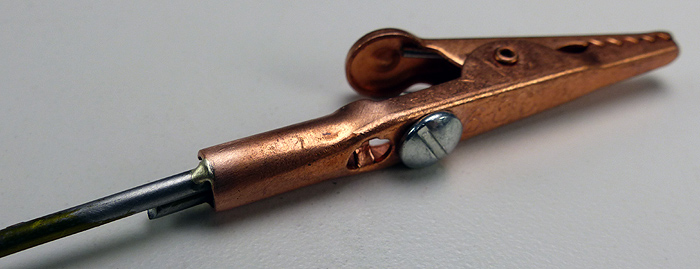
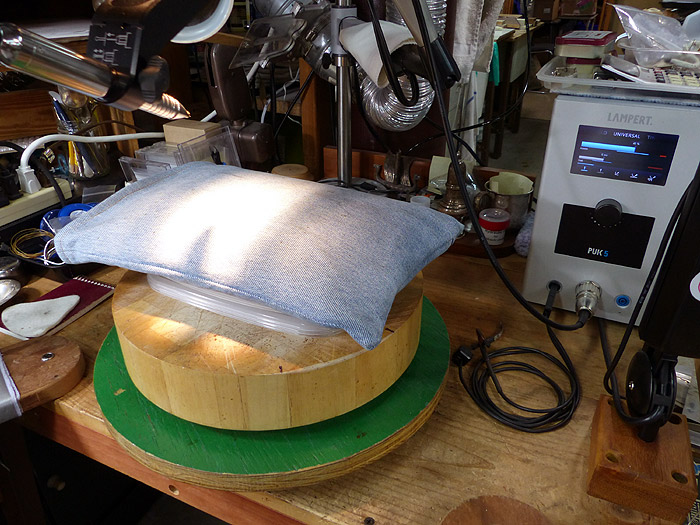

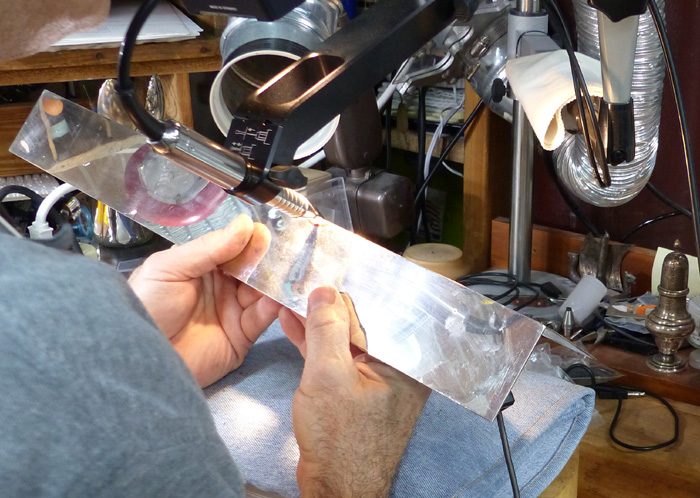
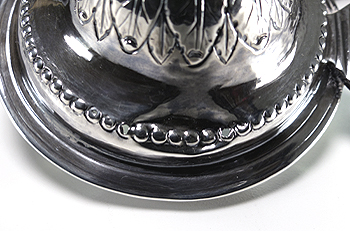
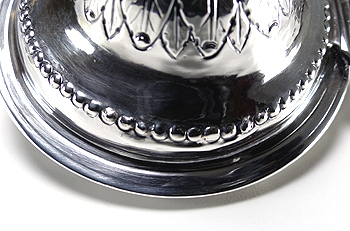
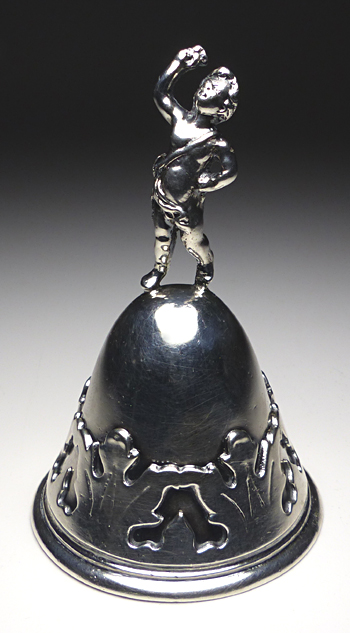
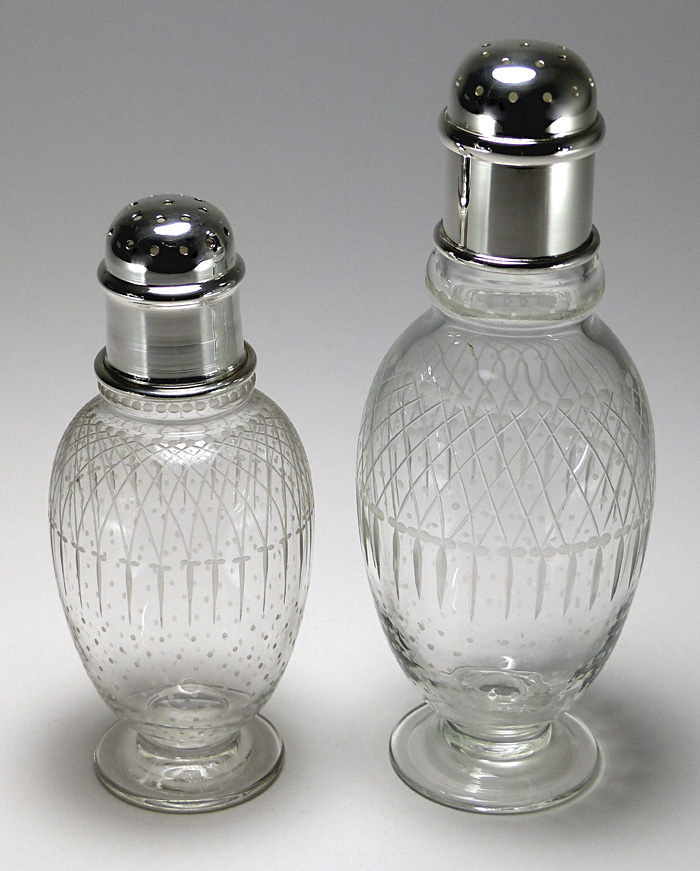

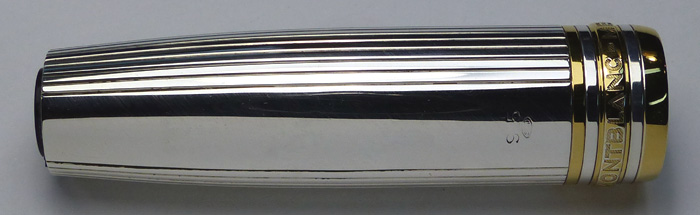
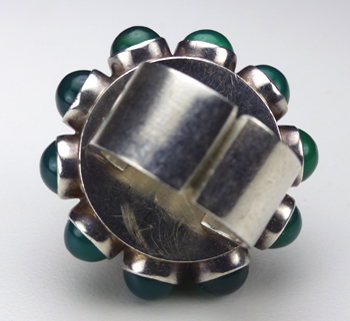
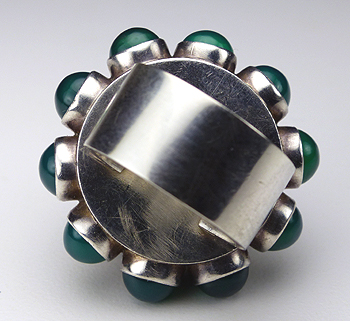
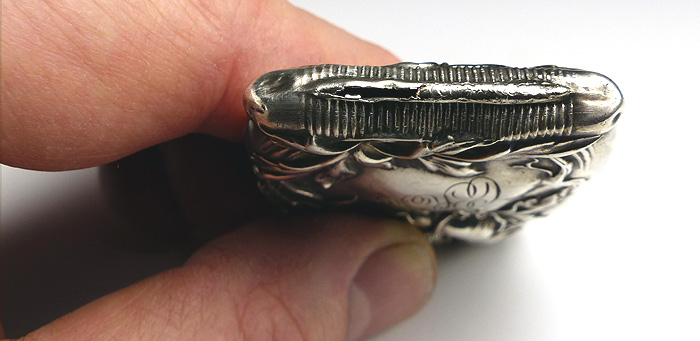
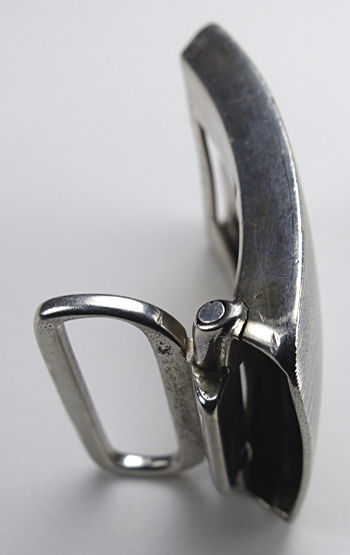
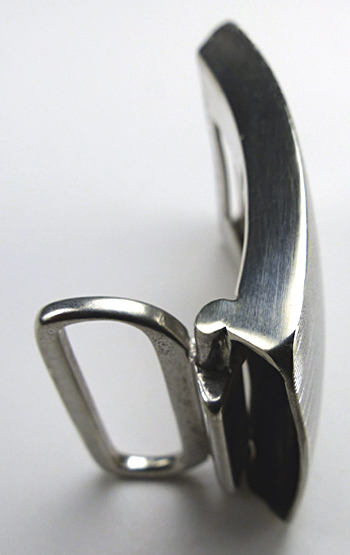
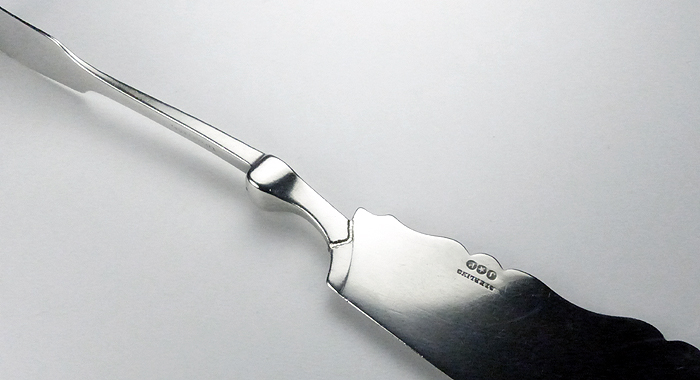
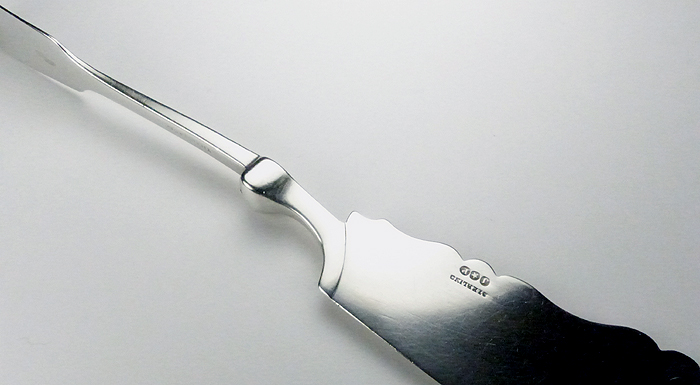
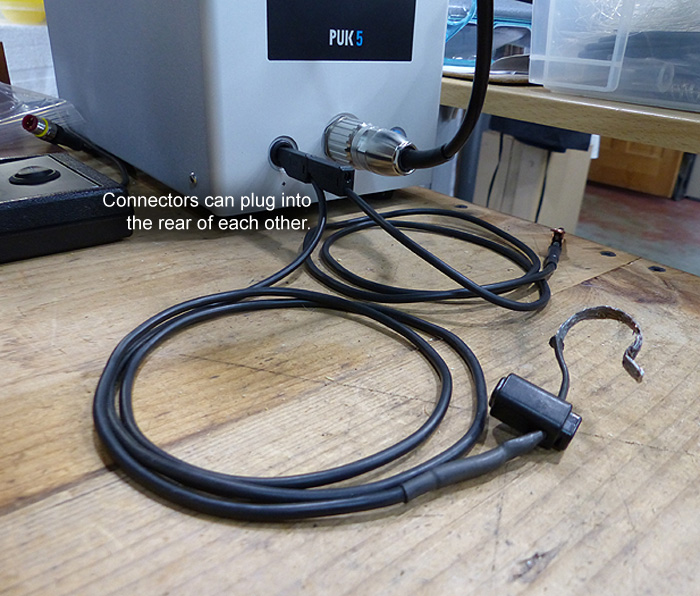
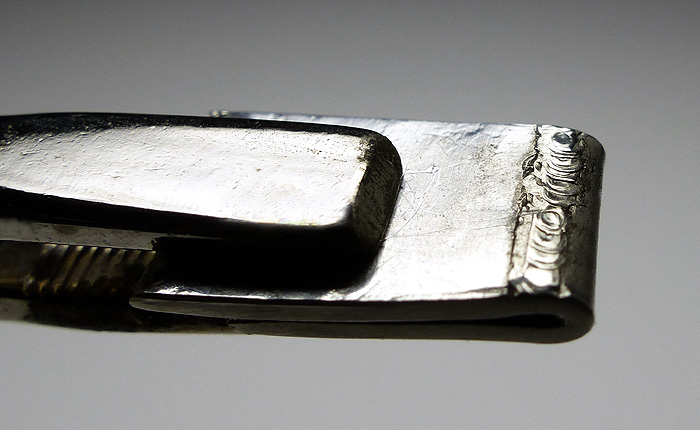
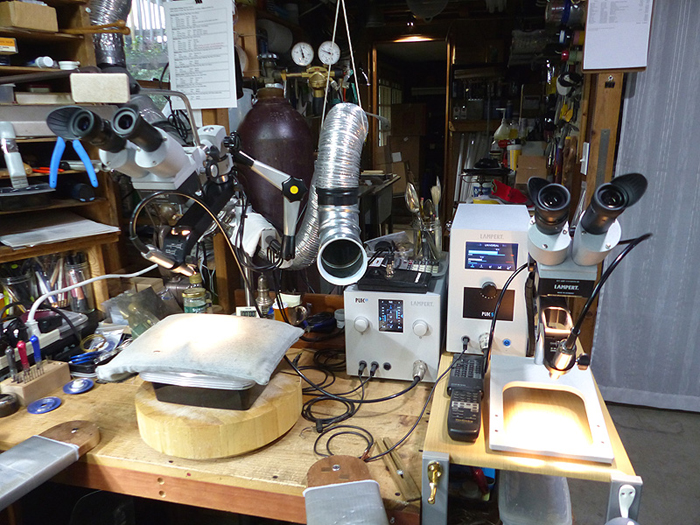
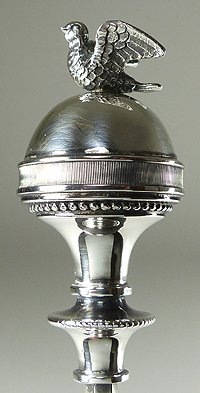
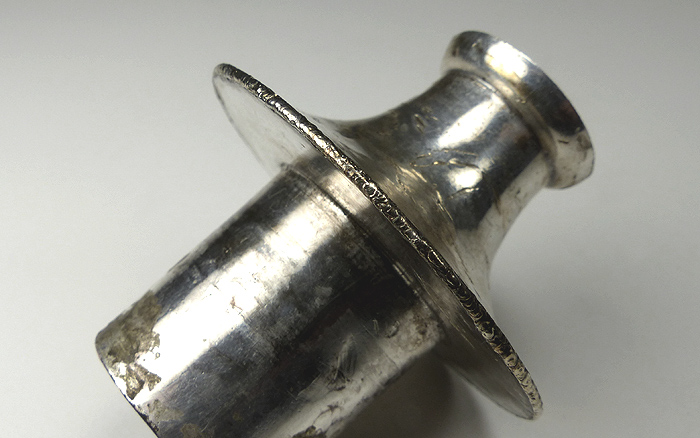
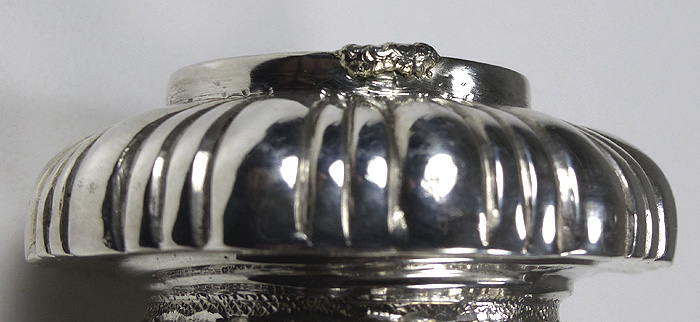
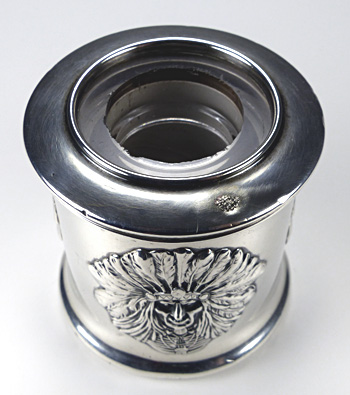
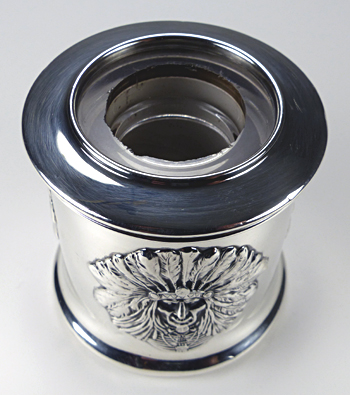
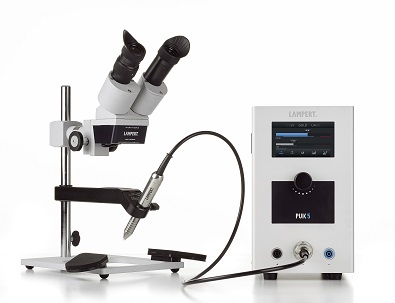
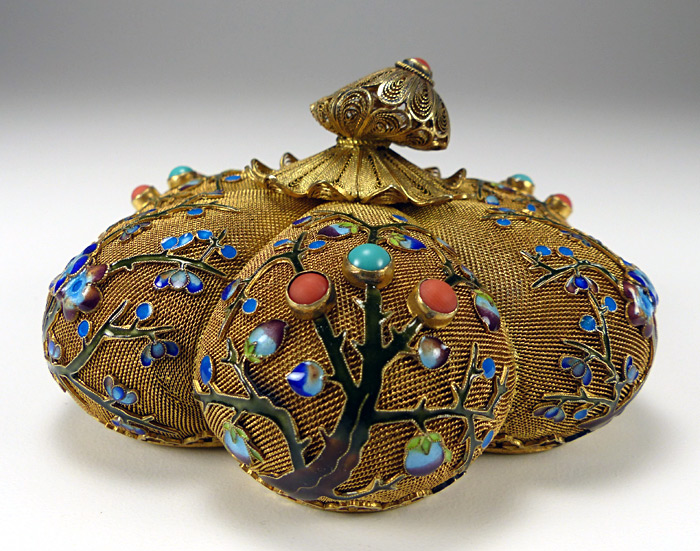
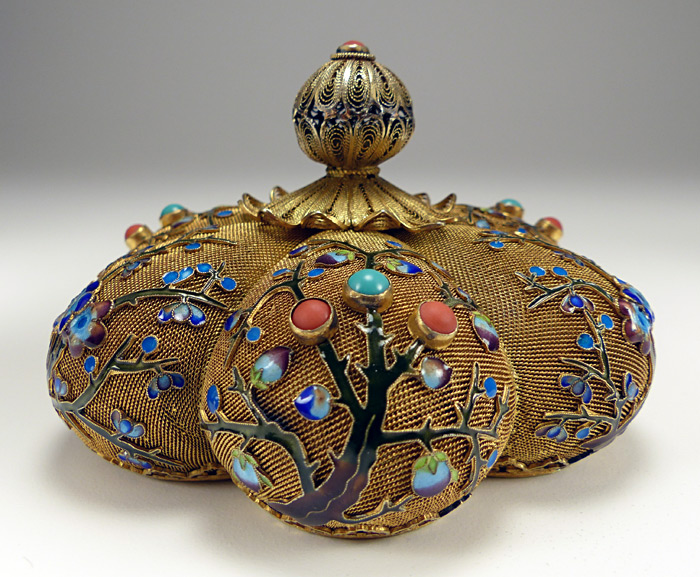
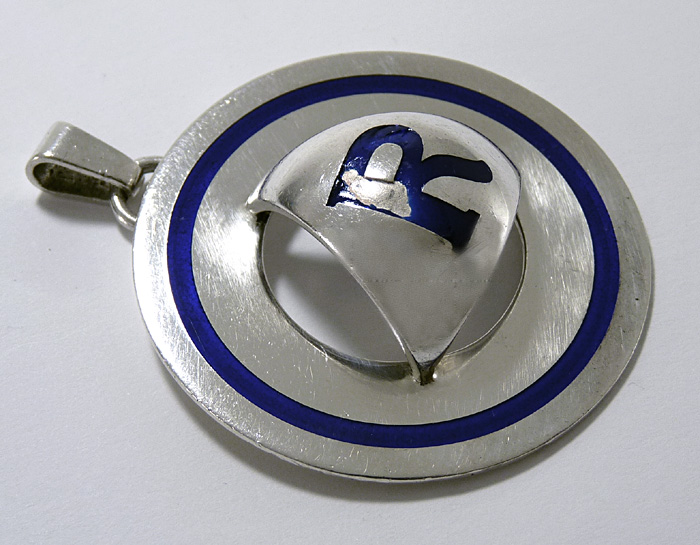
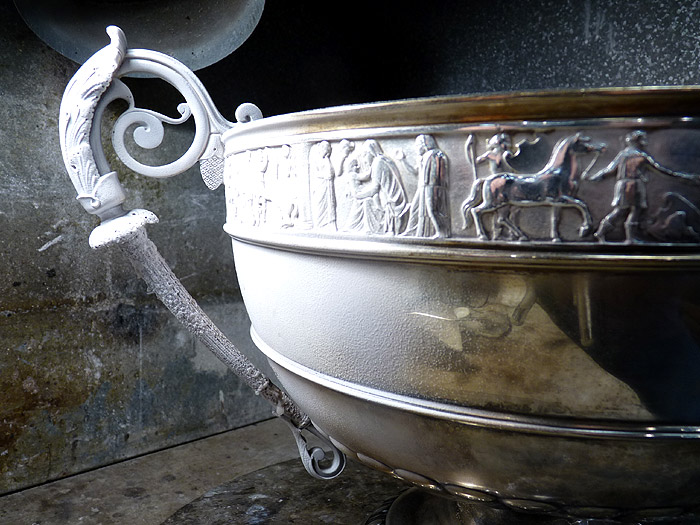
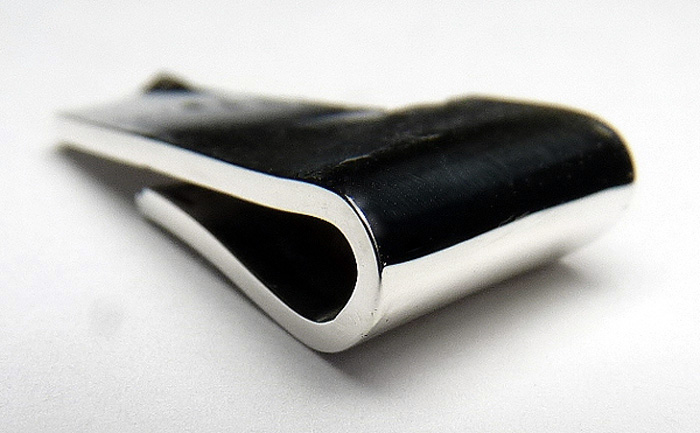
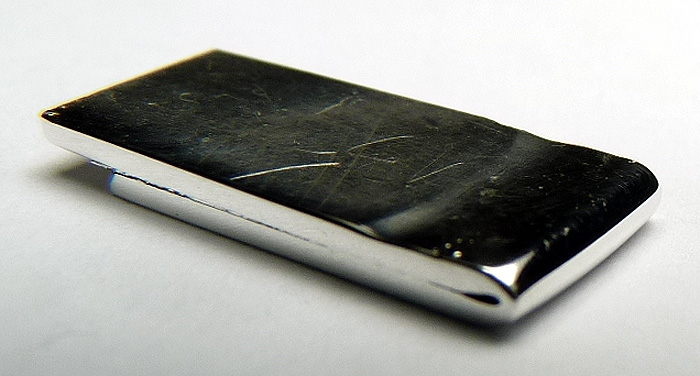
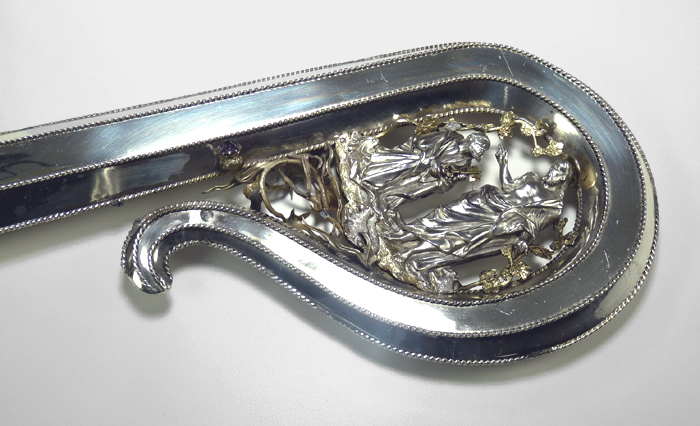
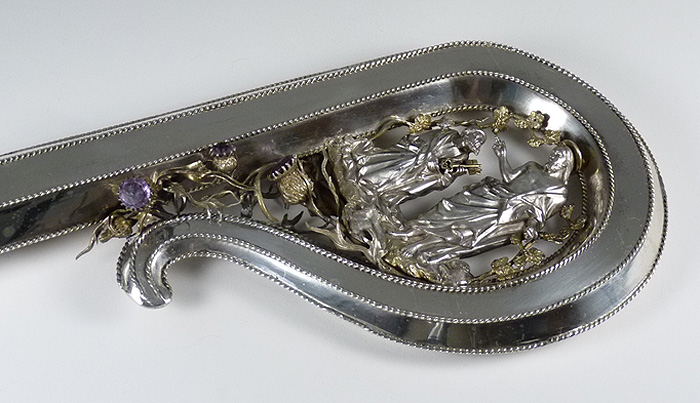
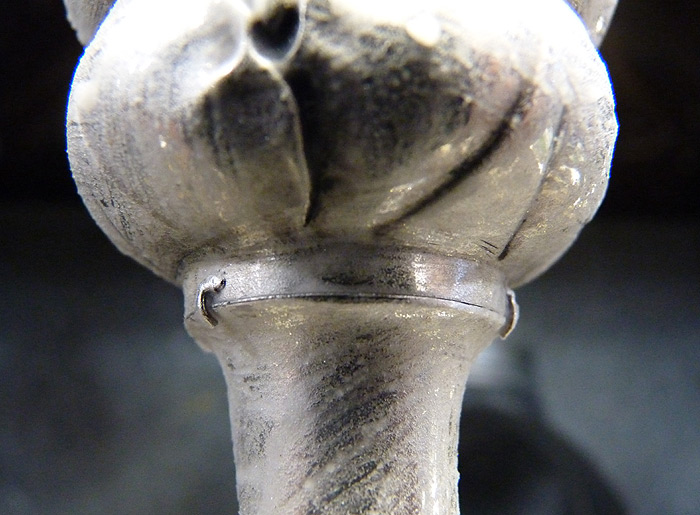
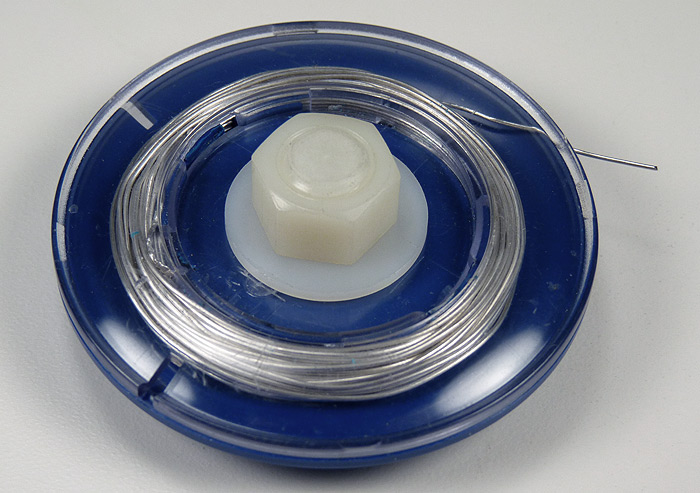
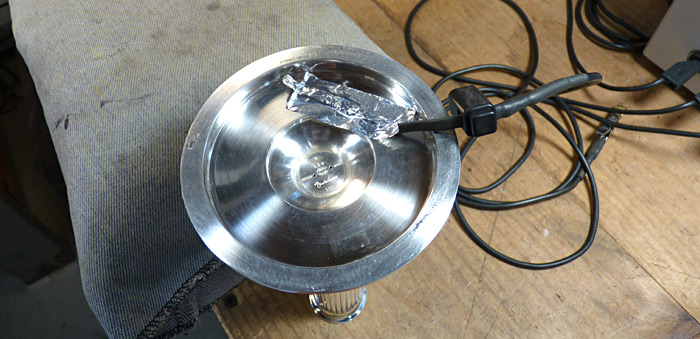
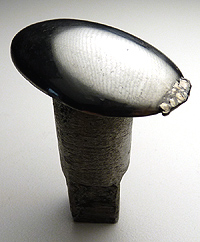
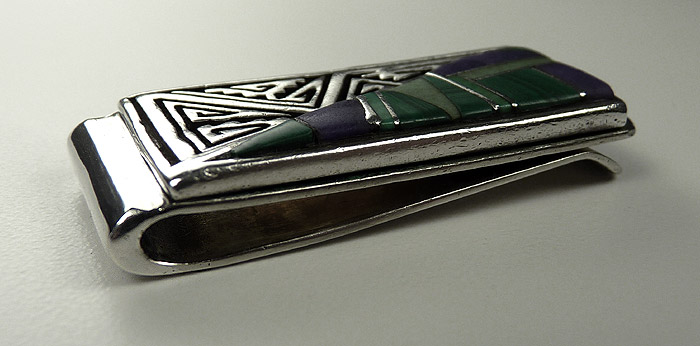
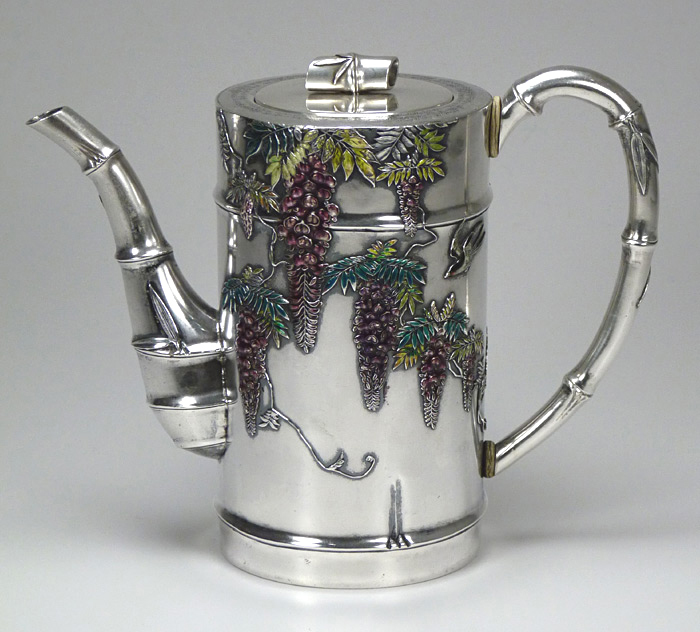
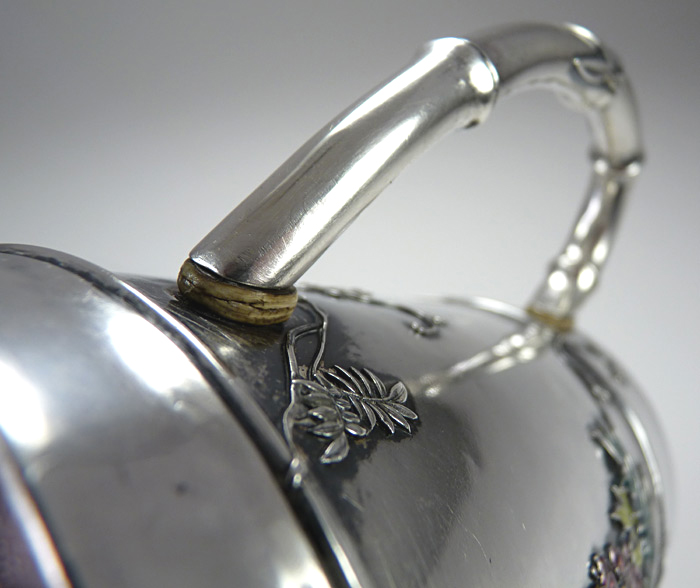
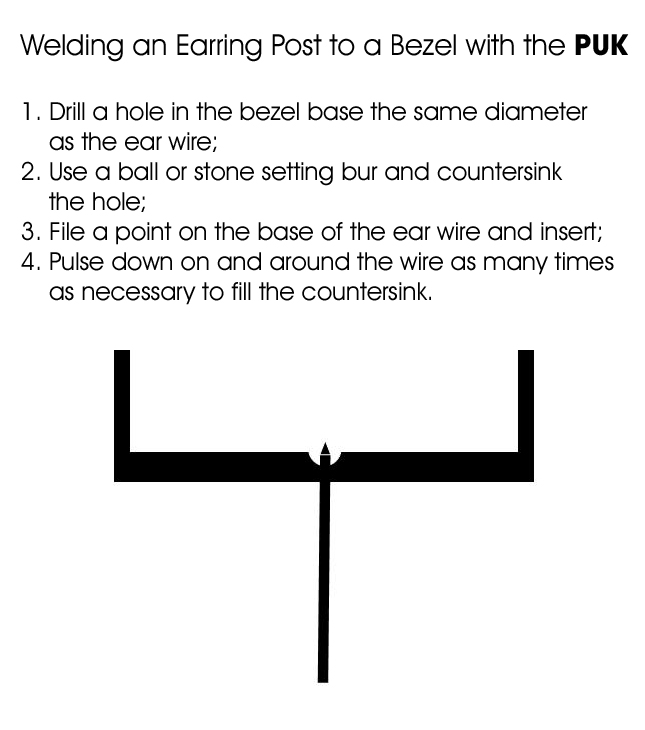
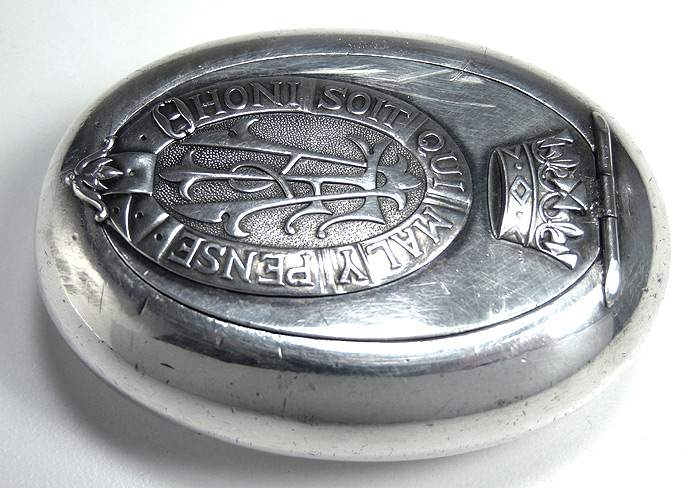
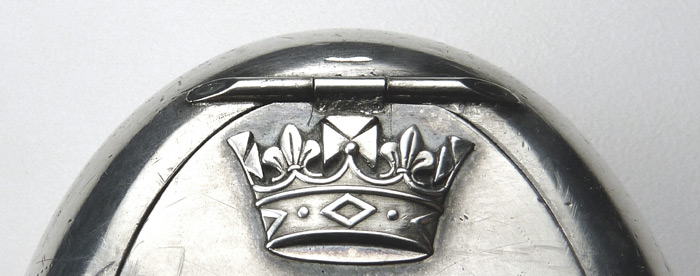
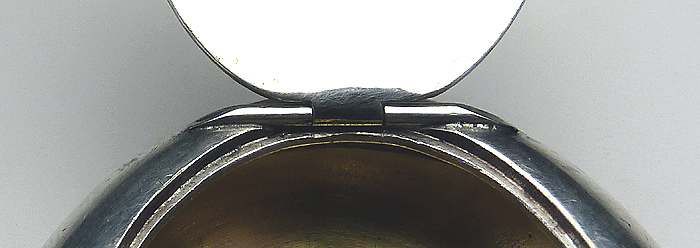
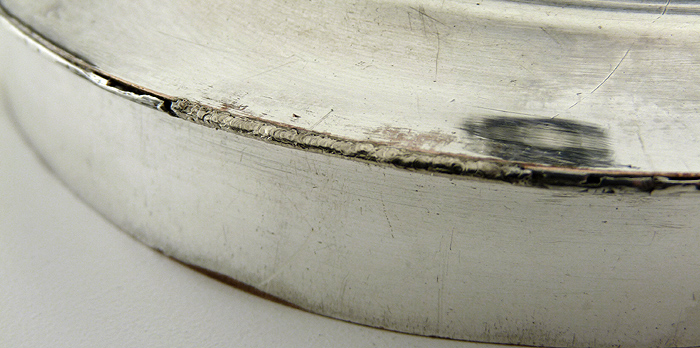
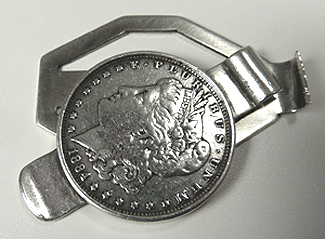
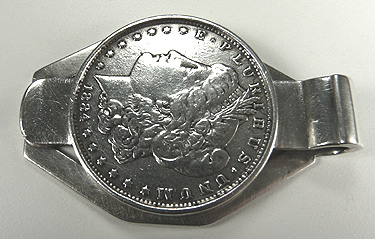
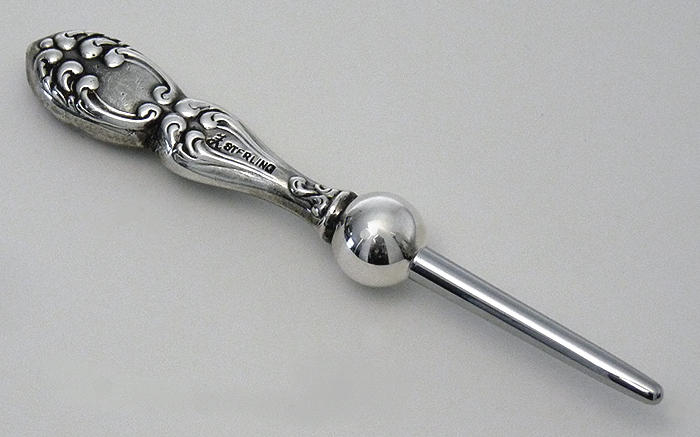


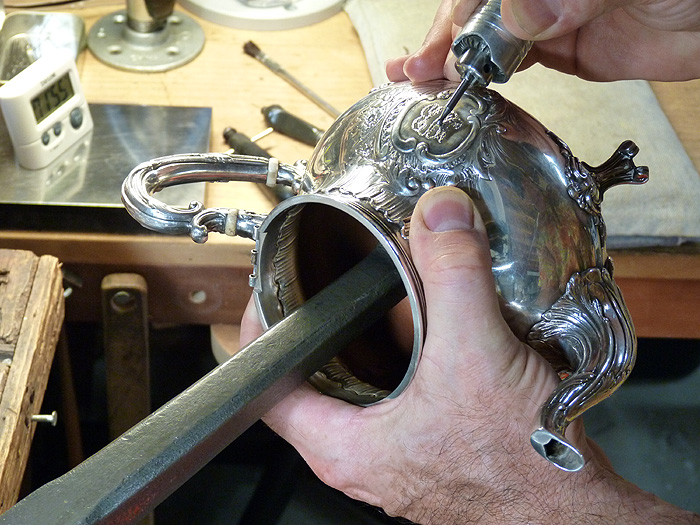
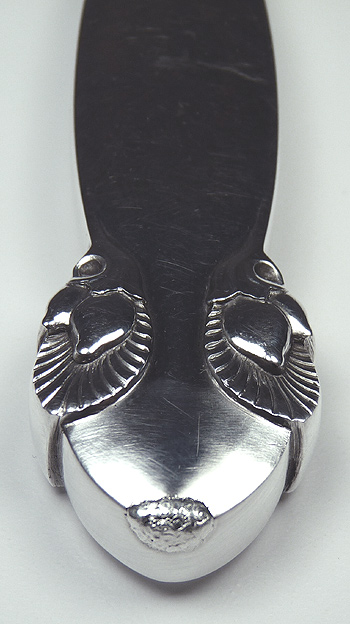
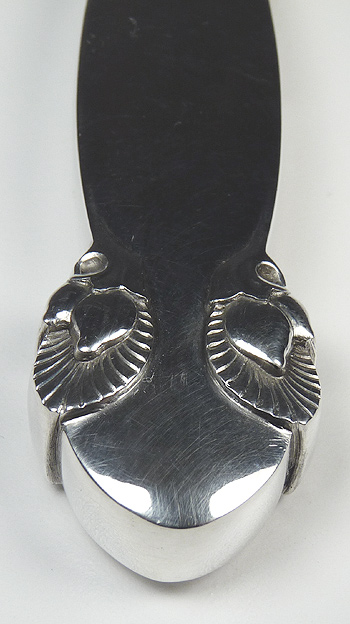
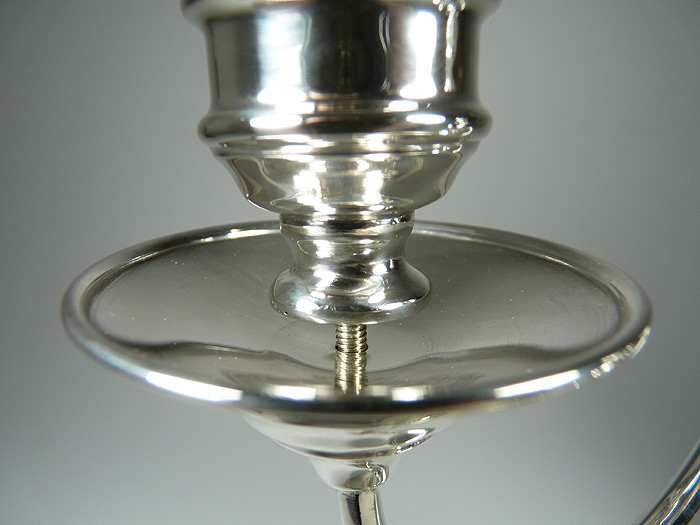
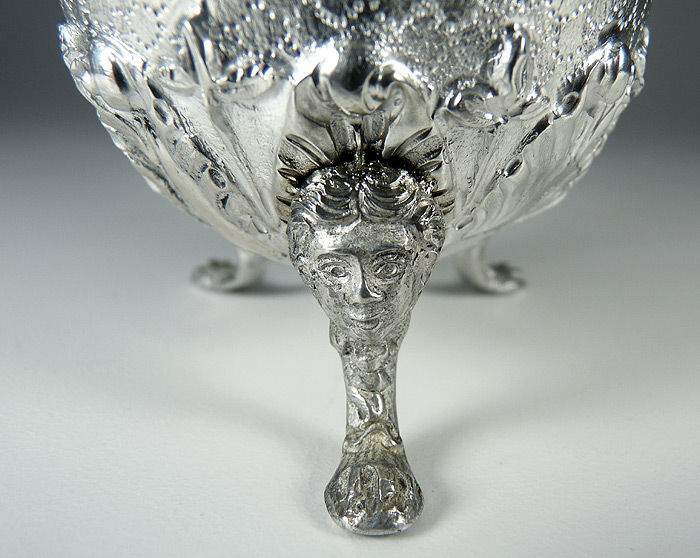
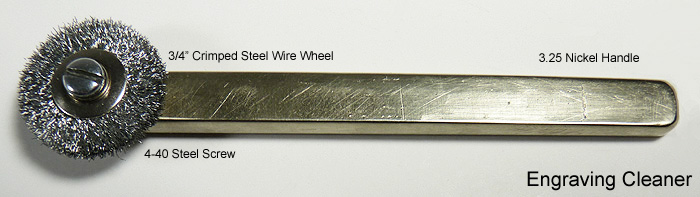
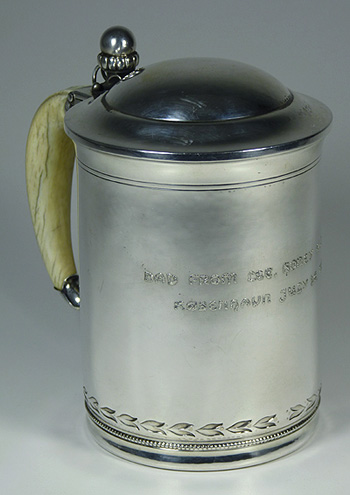
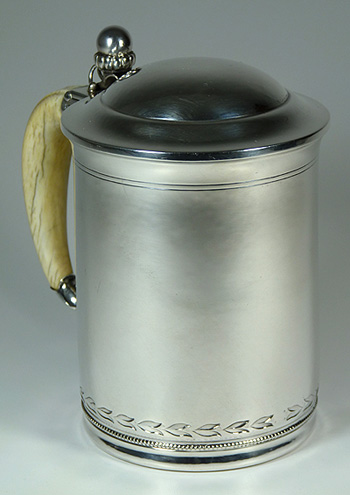
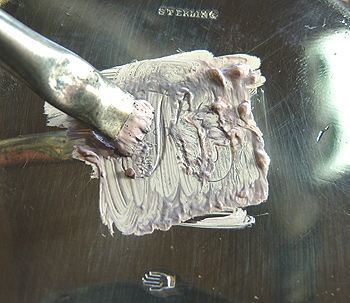
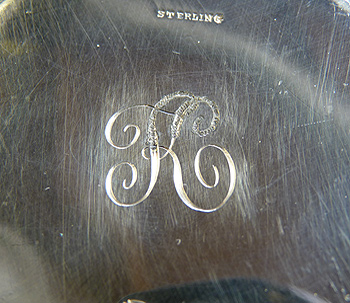

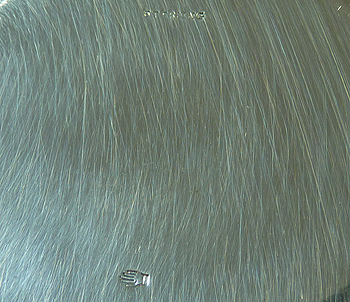
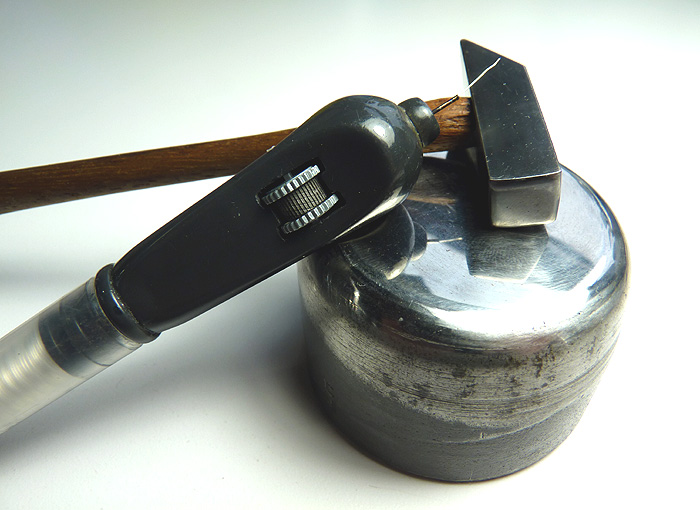
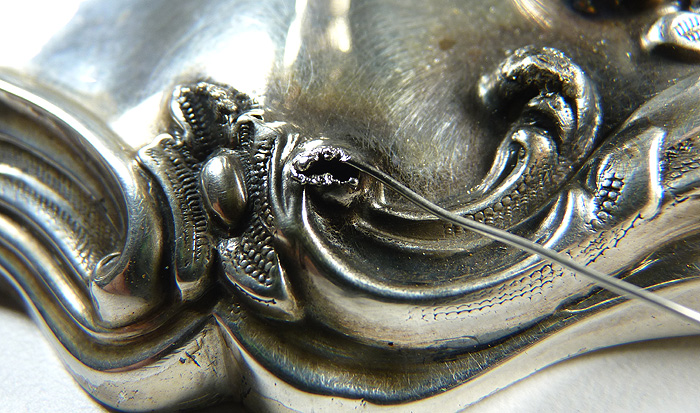
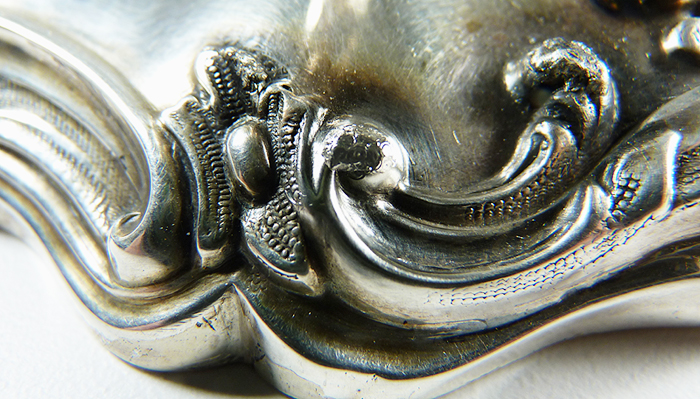
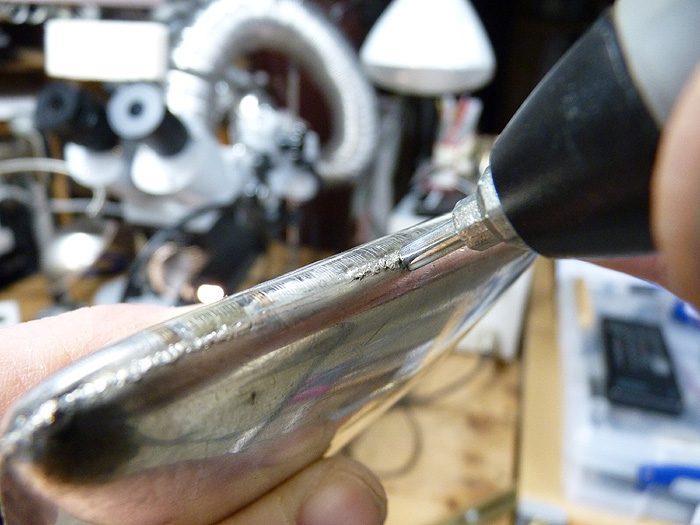
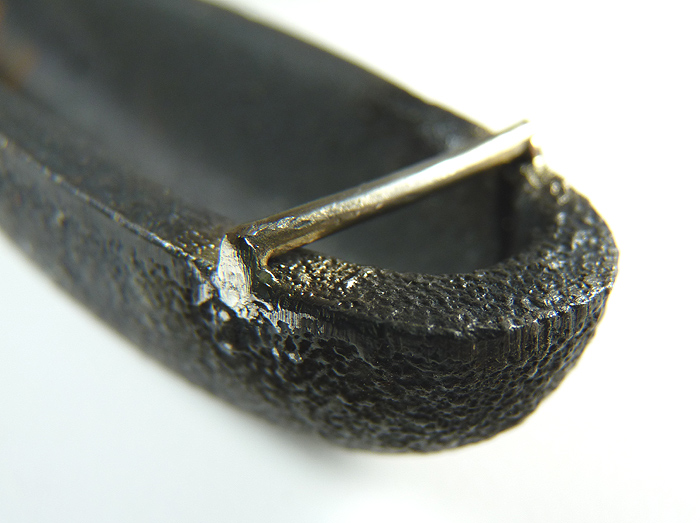
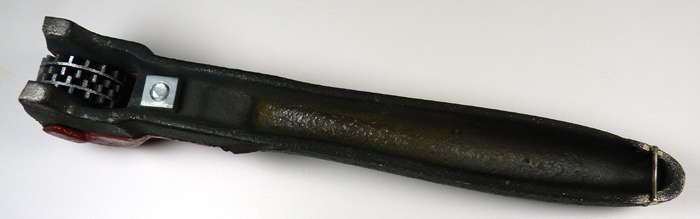
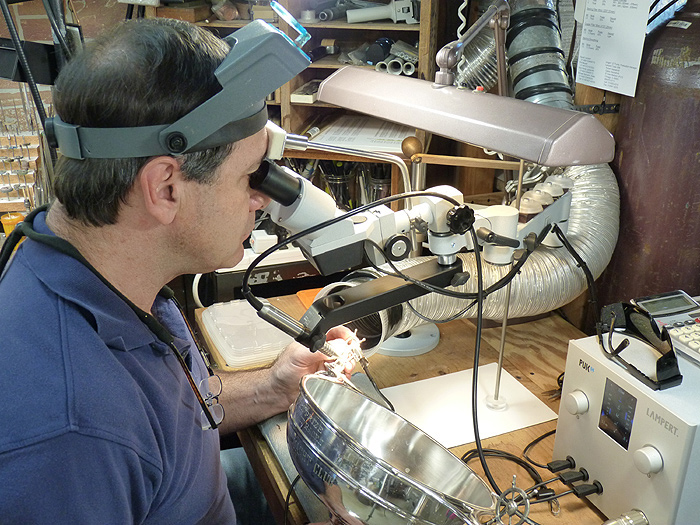

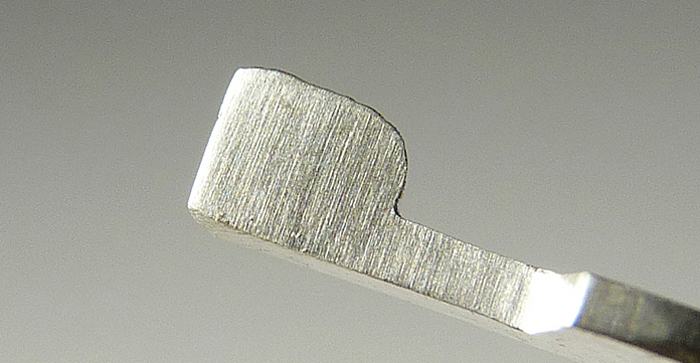
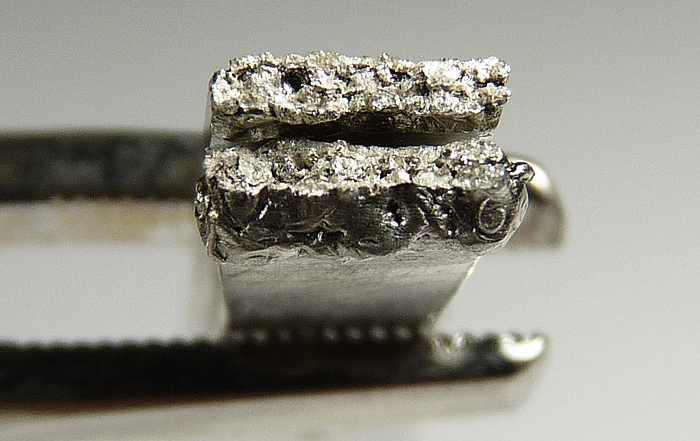
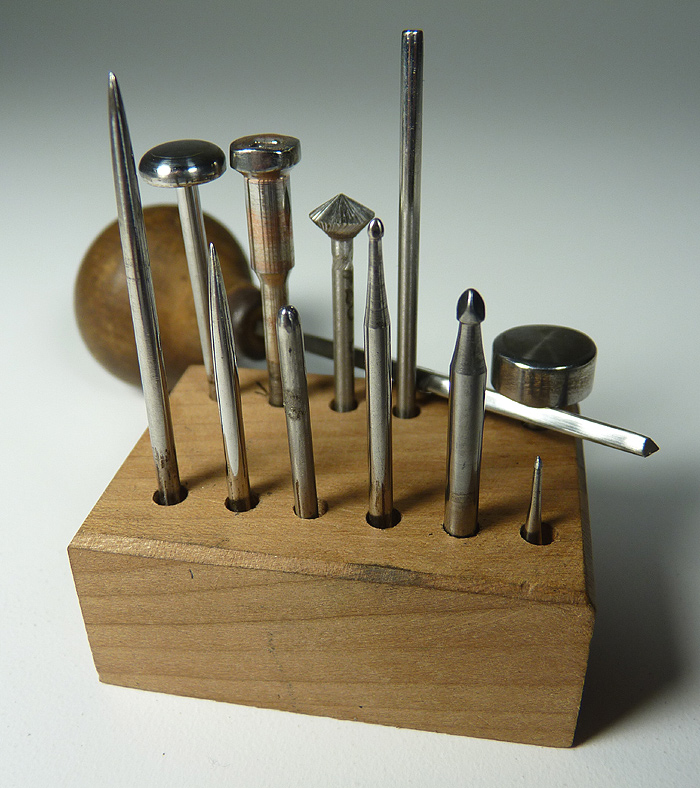
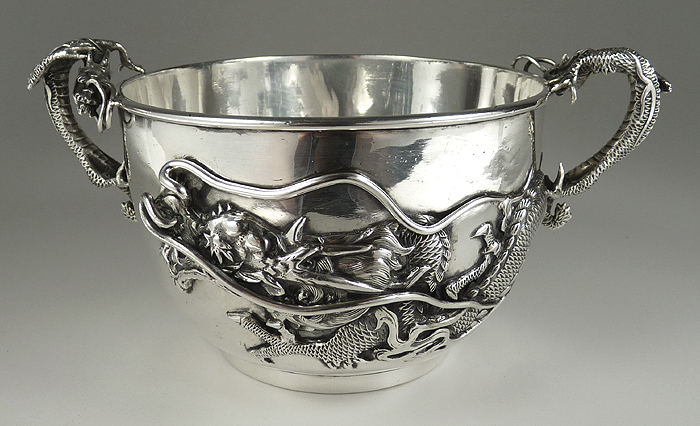
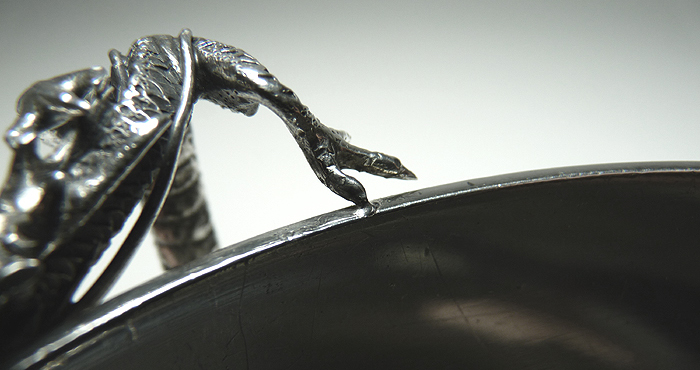
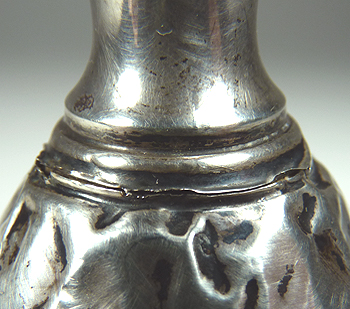
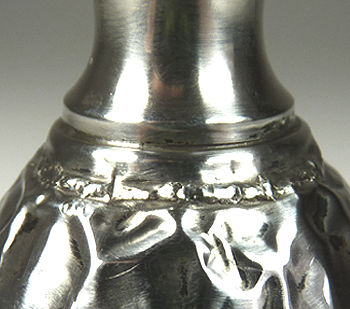
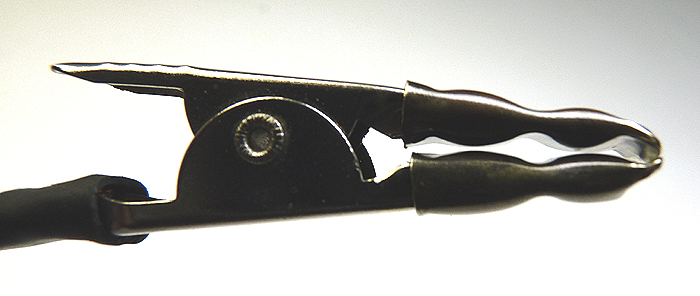

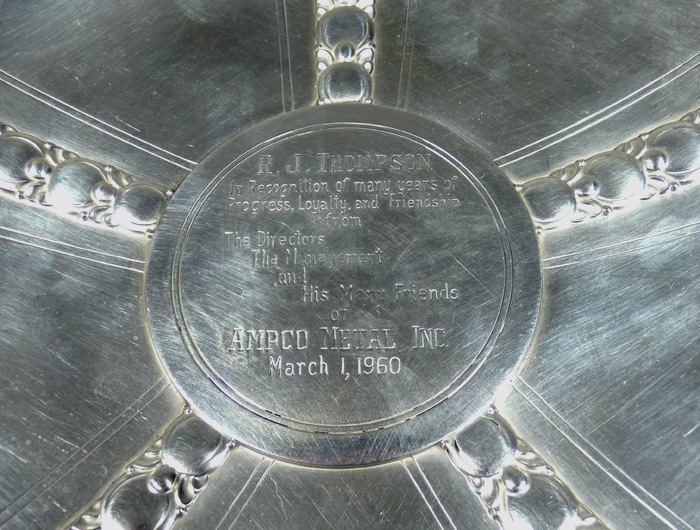
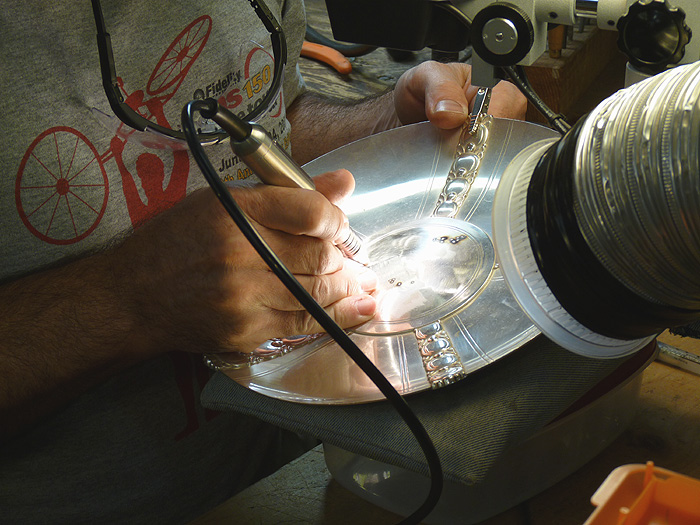
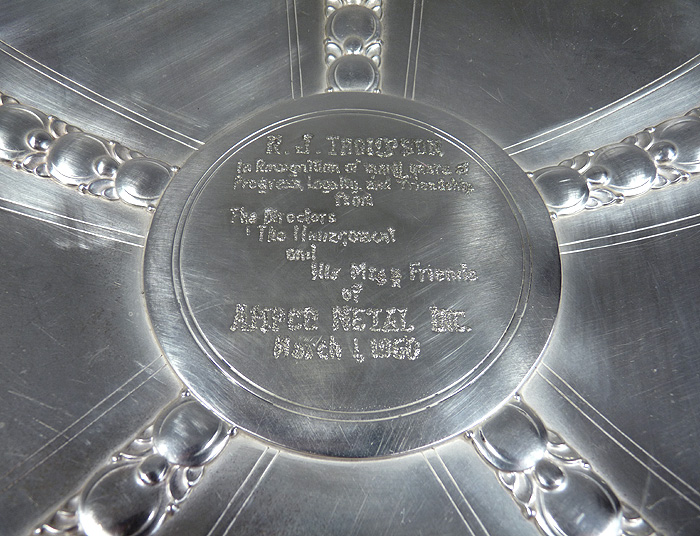
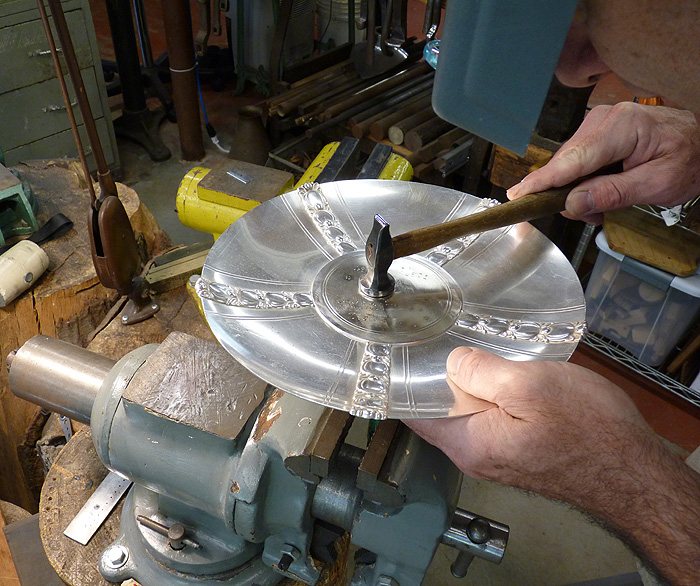

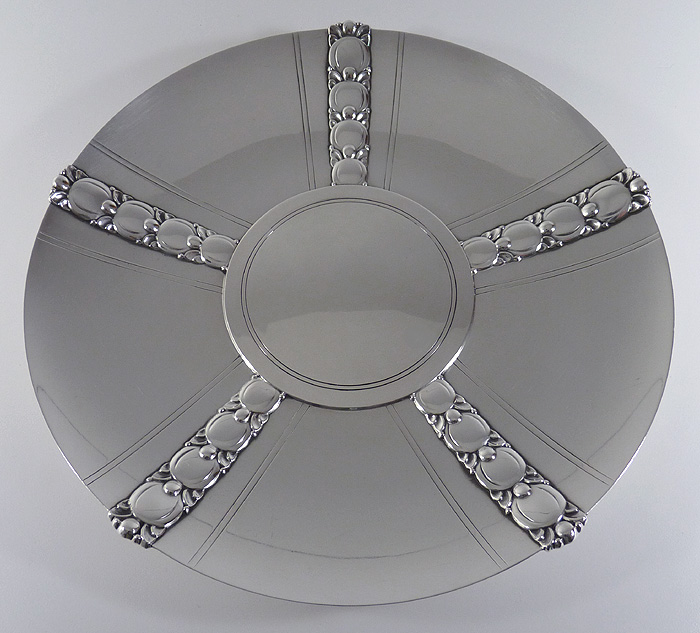
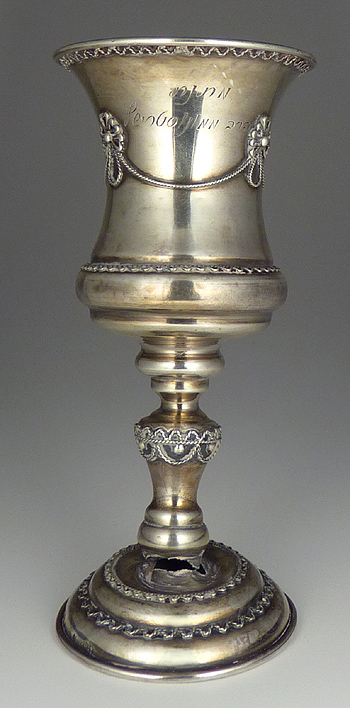
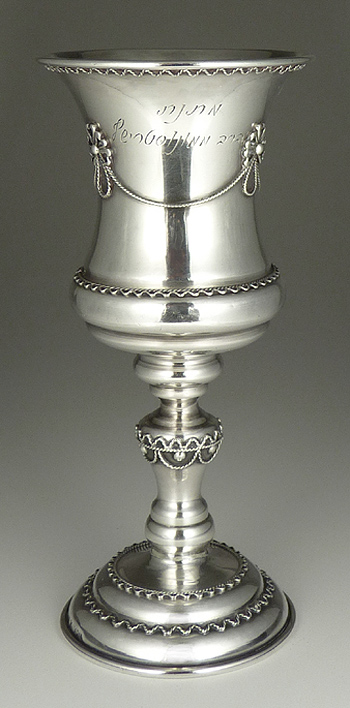
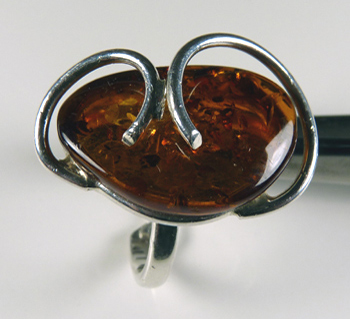
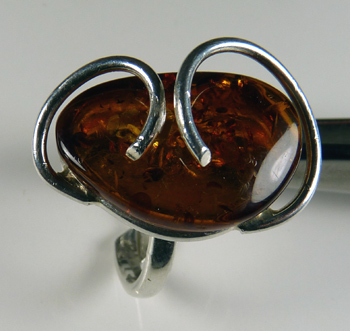
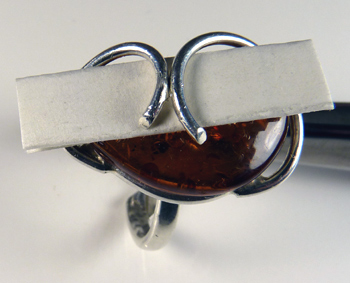
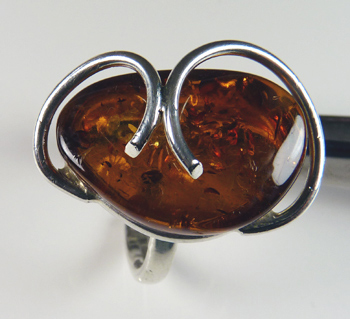
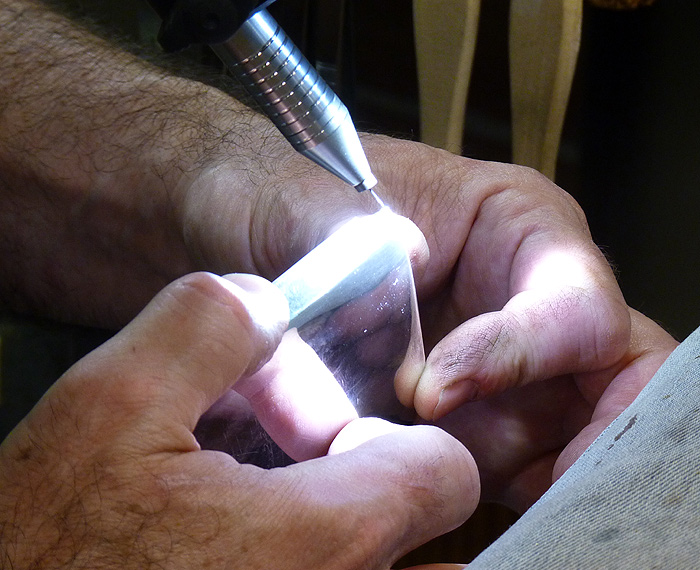
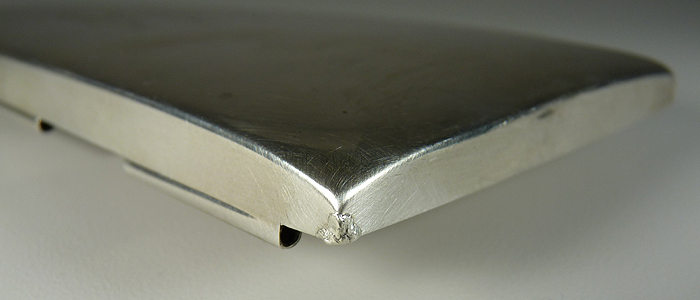
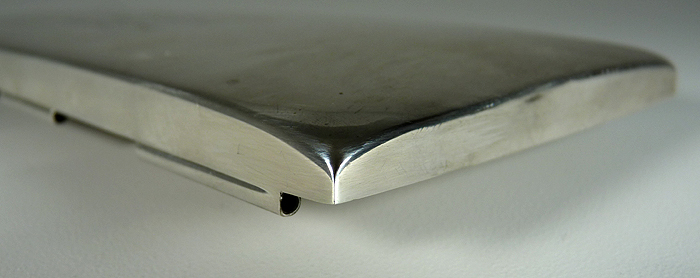
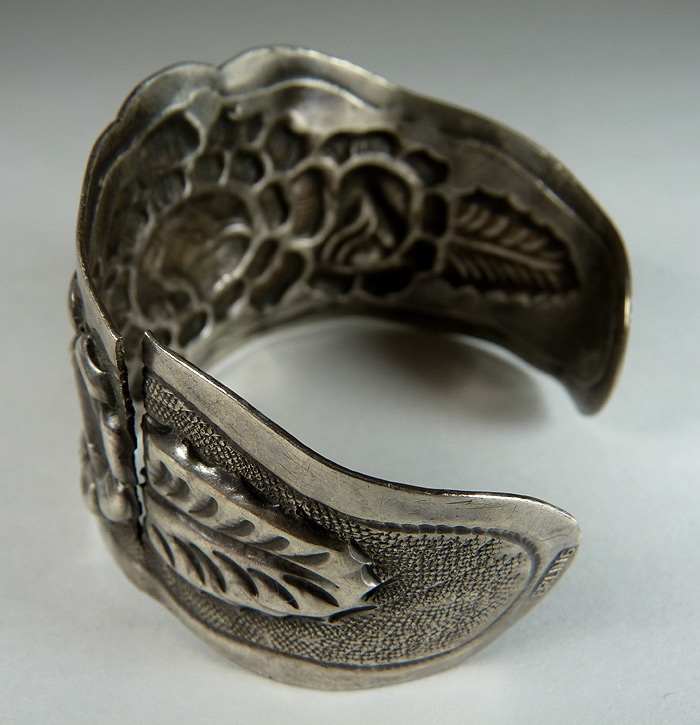
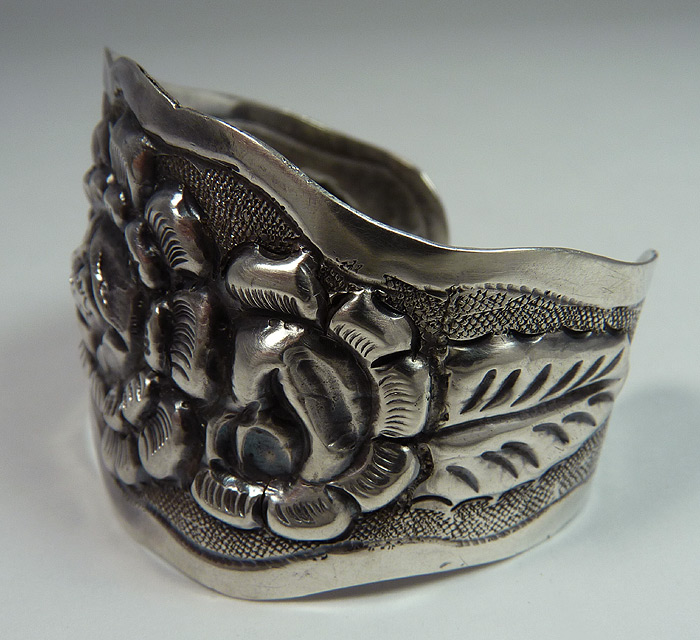
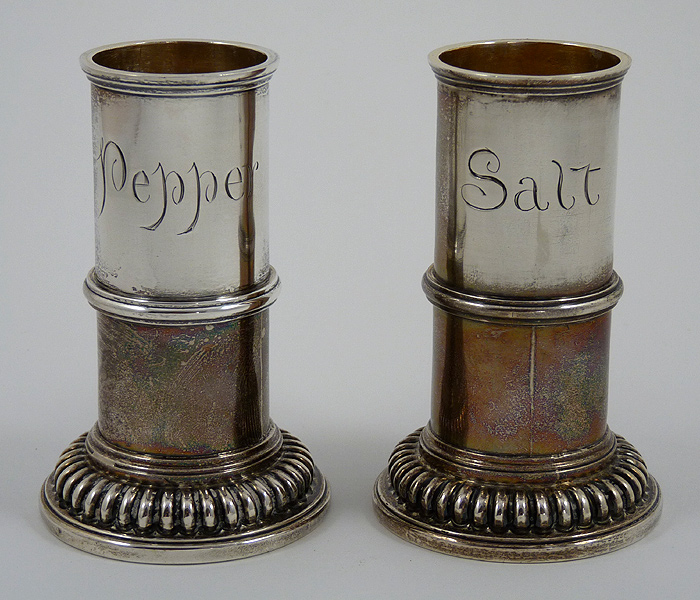
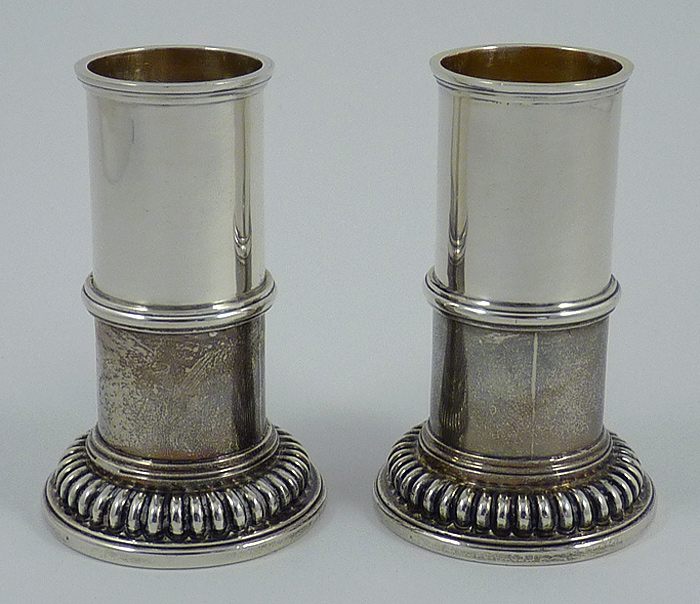
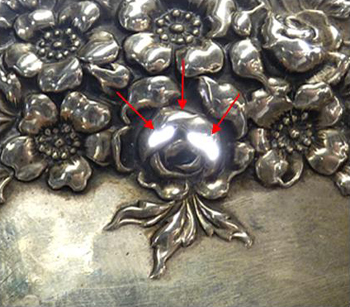
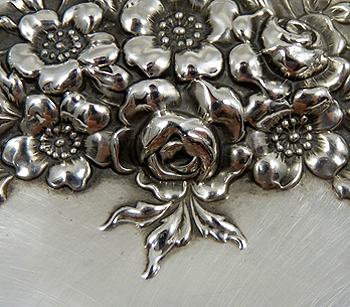
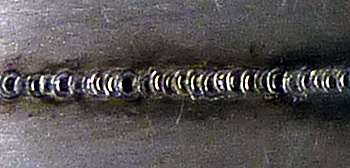 Standard
sterling
Argentium
Standard
sterling
Argentium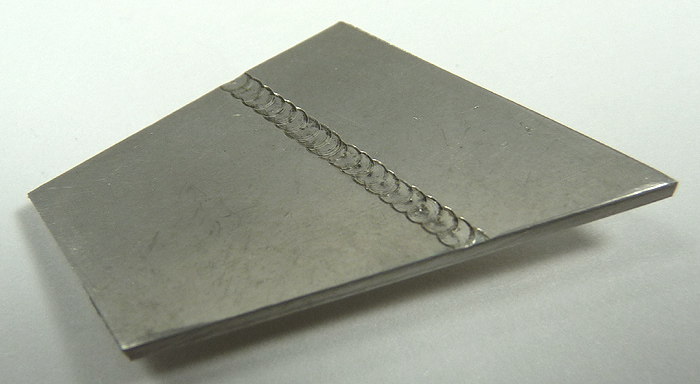
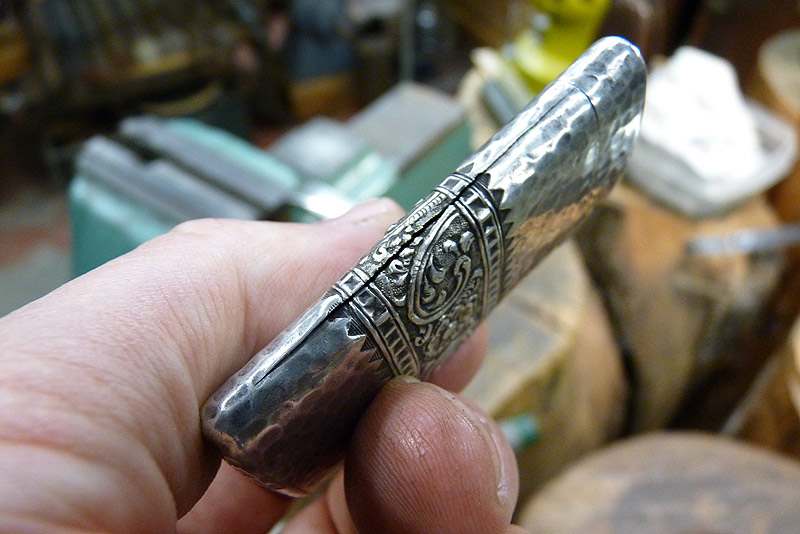
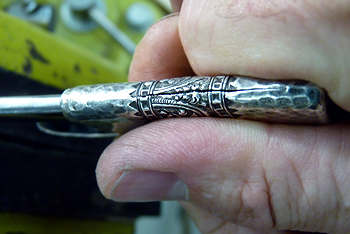
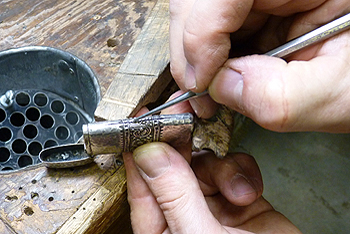
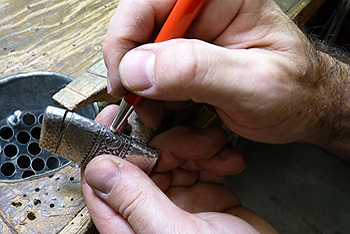
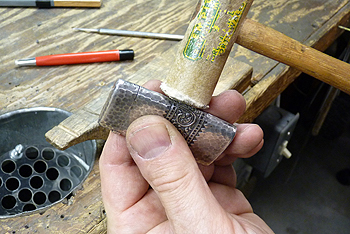
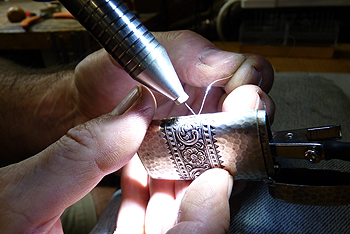
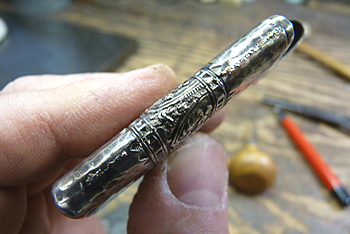

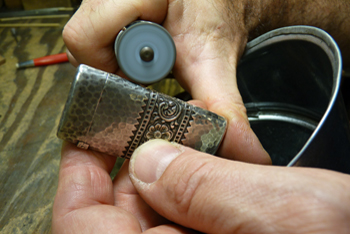
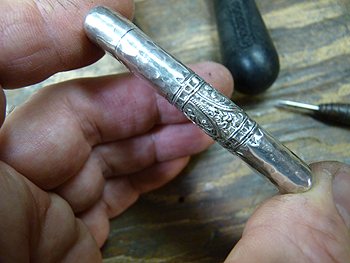
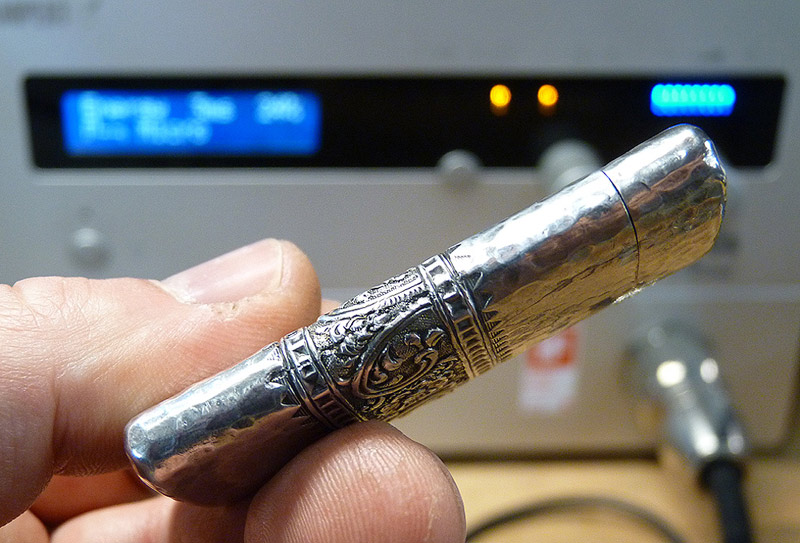
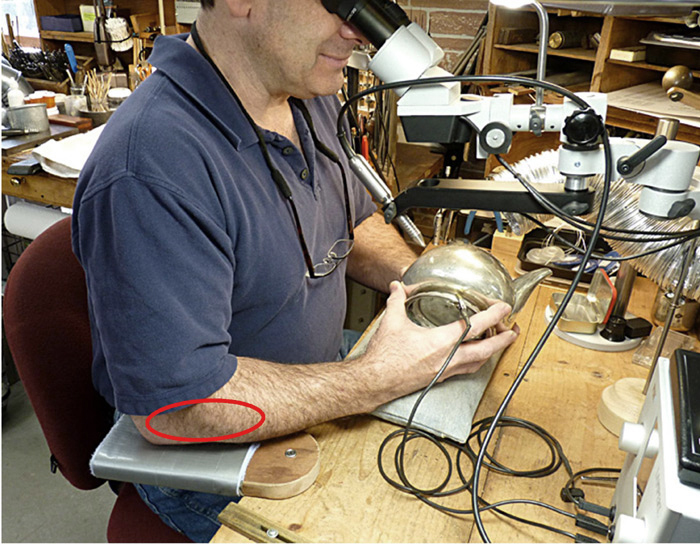
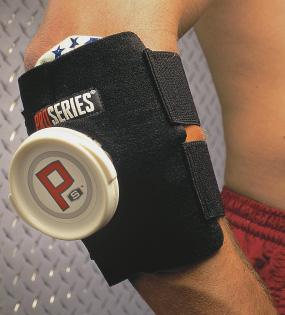